Entries from July 29th, 2011

Whole Wheat Shortbread Cookies

Friday, July 29, 2011

True confession of the day: I actually don’t like whole wheat baked goods.  I KNOW it’s healthier for me and I KNOW I should be eating them, but you really can’t beat a good slice of sourdough bread, so why bother eating anything else?  This recipe, my friends, is exactly how you eat whole wheat baked goods and actually enjoy them.  So first, the story on how I discovered these cookies…

Me, being an overachiever, decided that for our 2 year anniversary I would surprise the boyfriend with a scavenger hunt, ending with a picnic basket of baked goods and a mini bottle of champagne.  Huckleberry is just a few blocks away from my apartment and is the end all and be all of baked goodies as far as I’m concerned.  I asked them to throw one of their whole wheat shortbread cookies into the box of goodies going into the basket only because it was shaped like a heart and I thought I should probably put something “love” related in there.  So later, after eating what I thought was the good stuff out of the box , I decided to give the cookie a try and I was floored at how delicious it was!  Whole wheat!  Amazing!  I almost thought they must be lying, because I was sure that whole wheat doesn’t taste this good.  It added just a touch of warm nutty flavor that made the shortbread even better than recipes that use all white flour.

Cut to a year and then some later and I was confronted with the task of bringing some healthy foods to a local harvest exchange.  That was where the plum butter came in and these cookies came to accompany.  I decided to scan the internet, thinking someone out there must have some vaguely close recipe for whole wheat shortbread cookies that come even marginally close to how delicious Huckleberry’s were.  Lo and behold…the first recipe I clicked on was an article on Huckleberry in which the pastry chef gave their recipe for whole wheat shortbread cookies!  Score!!

Note:  The original measurements for these cookies were in weight format, as that’s how most commercial pastry chefs measure ingredients.  I bought a scale and measured them all out so you, my dear readers, don’t have to buy a scale-but that’s why the random measurements look so random.  Also, these are extremely fragile cookies, so be warned that they don’t stack and travel well.

Whole Wheat Shortbread Cookies

Makes approximately 24 cookies
Adapted from Pastry chef Zoe Nathan of Huckleberry, Santa Monica

  • 2 cups all purpose flour (12 oz)
  • 1 1/8 cups whole wheat flour (6 oz)
  • 3/4 cup cornstarch (5 1/2 oz)
  • 9 sticks European style butter, softened (18 oz)
  • 1/2 cup + 2 tablespoons sugar
  • 1 1/4 teaspoon salt
  • extra sugar for dusting
  1. Preheat the oven to 325 degrees; in a large bowl combine both flours and the cornstarch.
  2. Cream butter, sugar and salt.  When you start out, it will be large clumps, then the longer you mix them, the lumps will get smaller and smaller until all of a sudden it will break and be a smooth batter.  It’s the same magic that happens when you make frosting.
  3. Add the flour mixture to the butter mixture and combine, being careful not to over mix.
  4. Be warned that this is a very soft dough.  Roll out the dough on a lightly floured surface to about 1/4″ thick.  (I like to sprinkle a little flour on top of the dough and on the rolling pin as well-this dough is super sticky!)  Cut the dough out with your choice of cookie cutters.
  5. Transfer shapes to a cookie sheet lined with parchment paper-cookies will not spread very much so you don’t have to worry about so much spacing between the cookies.  Bake until brown around the edges-my oven did it in about 20 minutes.
  6. Remove the sheet from the oven and, without moving the cookies yet, sprinkle sugar over the cookies very very generously.  After the cookies have cooled for a few minutes on the cookie sheet, gently (gently!) move them to a wire cooling rack.
  7. Enjoy the cookies while upping your whole wheat intake for the day!

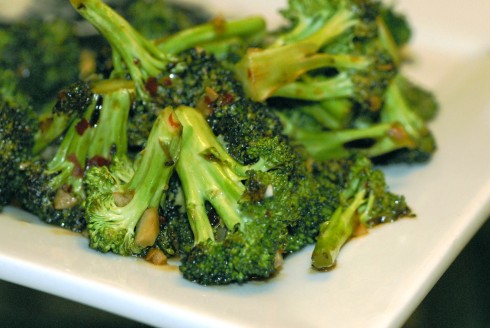
Stir-Fried Broccoli with Chili-Garlic Sauce

Wednesday, July 27, 2011

Chinese food has long been my go-to comfort food.  No matter where I live, there’s always at least one hole-in-the-wall Chinese food restaurant where the waiters know my face and ask if I want “the usual” (“the usual” for me is won-ton soup and beef and broccoli).  I always knew that I should be able to make this at home, given how much I eat it, but I always just left it to the professionals because the ingredient lists were daunting and I didn’t have a wok.  Until this recipe.  I still don’t have a wok, but I’ve certainly got a new way to whip up some broccoli quickly when I get home from work, since I had 75% of the ingredients already in my fridge.

I ran to the store to pick up some ingredients-my local Vons had no chili-garlic sauce, but they did have a giant $10 bottle of sesame oil.  No way! I would be skipping sesame oil and the sherry, because I just didn’t want to spend the money.  So I headed to Whole Foods, since they have a strangely more international section than any super grocery store for the chili-garlic sauce.  Lo and behold, they had a smaller $5 bottle of sesame oil and I grabbed it.  Once I got home, I opened the bottle of sesame oil and hesitated before taking a sniff…and that one sniff changed my whole perspective of making Chinese food at home.  Sesame oil IS the smell of Chinese food!  I couldn’t believe that all this time I had been foregoing what was probably the most important ingredient of Chinese food.  No wonder it never tasted as good as what I got from the local take-out place!

Stir-Fried Broccoli with Chili-Garlic Sauce
Serves 2
Adapted from America’s Test Kitchen Cooking for Two 2011

  • 2 tablespoons low-sodium chicken broth
  • 1 1/2 teaspoons soy sauce
  • 1 teaspoon Asian chili-garlic sauce
  • 1/2 teaspoon sesame oil
  • 1/2 teaspoon cornstarch
  • 3 1/2 teaspoons vegetable oil
  • 2 garlic cloves, minced
  • 1/8 teaspoon red pepper flakes
  • 12 ounces broccoli florets
  • 1/8 teaspoon sugar
  1. In small bowl, whisk broth, soy sauce, chili-garlic sauce, sesame oil, and cornstarch together until well combined
  2. In second small bowl, combine 1/2 teaspoon of vegetable oil, garlic and red pepper flakes
  3. Heat remaining 1 tablespoon vegetable oil in 12-inch non-stick skillet over medium-high heat until just smoking.  Add broccoli and sugar and cook, stirring frequently, until broccoli is well browned, 5-7 minutes.
  4. Stir in garlic-oil mixture and cook until fragrant, about 15 seconds.  Add broth-soy sauce mixture and toss until broccoli is evenly coated.

Plum Butter

Monday, July 25, 2011

Every fall I eagerly await apple season: it means apple juice, apple sauce, and caramel apples (never mind the fact that I’m actually allergic to apples…I just pretend like I’m not).  My favorite of all apple treats though, is apple butter.  But looking at the calendar, it’s in the middle of summertime and apple butter time isn’t even close!  That said, summertime is a cook’s dream because of the wide variety of fresh produce available.   So instead of whining about apple butter not being in season, why not take summer’s best fruits and make them into fruit butter instead??  And thus, plum butter was born.

Deliciously tart, a little sweet and a little spicy, plum butter is one of my new favorite ways to wake up on a summer morning.

Because I brought my batch of plum butter to an event in Venice and since there would be no refrigeration, I had to go through the canning process to ensure the people taking home my plum butter wouldn’t keel over with botulism.  That said, while hot and steamy for sure, the canning process is really not the big deal everyone makes it out to be.  Three easy steps:  1) heat the jars in water so they don’t break when you put hot food in them 2) fill with food 3) boil the jars for 5 minutes and then turn off the burner and let the water cool for 5 minutes before taking the jars out of the water.  Seriously, that’s it.  I couldn’t believe it either!

Even better news: if the plum butter isn’t leaving your house and you’re planning on eating it within a few weeks, then all you need to do is stick it in the fridge and call it good.  No steamy canning needed!  If you want to make a lot and store it in your pantry, then canning is necessary.  Truthfully, I haven’t tried freezing it yet, but I bet that would be a great option if you have just an extra jar or two but don’t want to go through the canning process.  Anyone out there who tries it, let me know!  So now, without further ado…summer’s finest at it’s most concentrated deliciousness.

Note: I made two batches of butter, one in my cast iron Le Creuset and the other in my normal stainless steel cookware.  The batch made in my Le Creuset thickened much faster than the one in my stainless steel pot.  I highly suggest using a cast iron pot if you have it.

Also Note: The canning instructions I wrote out below are for sea level altitude, since I’m right here on the coast.  Apparently boiling times are longer for higher altitudes.  Of course, I am no canning expert, this being my first time, so definitely consult the instructions that come with your new tray of canning jars!

Plum Butter
makes about 4 cups
adapted from Martha Stewart

  • 3 1/2 lbs plums (I used the larger black plums instead of red plums)
  • 1 1/4 cup sugar
  • 1 cup water
  • 3/4 teaspoon cardamom
  • 3/4 teaspoon cinnamon
  1. Dice plums into approximately 1″ pieces (about 8 pieces per half) and discard pits
  2. Put plums, sugar, and water into 6 qt pot, bring to a boil then reduce to a simmer (I forgot what I was doing and it boiled over, just fyi, it could happen to you); cook until fruit is very soft, approx 20 minutes
  3. Puree contents of pot in blender.  I used a food processor, which worked fine, but it is not liquid tight and I certainly had to wipe down the base of the processor after it a all said and done because some of the puree had worked its way up up under the blade and out underneath the workbowl.
  4. Return puree to sauce pan and add cinnamon and cardamom, stir.
  5. Cook puree down until thick and spreadable, about 3 hours, stirring often to prevent scorching.  I used a regular balloon whisk to stir the butter and by the end, when you take the whisk out, it is thick enough that you will see an imprint left behind of the whisk tines.
  6. While the puree is in the homestretch of thickening, place your mason jars and the flat parts of the lids into a large pot, cover with water and turn the burner on very low.  The point is just to warm up the jars and lids so that they won’t shatter when you put hot food into them (leave the rings out of the water so they’re cool for you to twist them onto the jars later).
  7. When the jars are warm and the butter is fully thickened to your liking, fill the jars up with butter, stopping about a 1/2 inch from the top of the rim to leave some air in the top of the jar.  Place a flat lid on the jar and twist on the ring.
  8. Heat up another large pot of water to simmering and put jars full of butter into the simmering water.  Turn up the heat to boil the water; boil jars for 5 minutes.  Turn off the burner and leave the jars in the water (you’ll see bubbles still escaping from under the jar lid during the cool down phase, this is good).  Take the jars out and set them on a towel on the counter top.  The instructions say to leave the jars undisturbed for 12-24 hours (I did not have that luxury of time).  You’ll know you’ve done a successful canning job if the lid is firm and doesn’t pop up and down when you press on it.  Some of mine popped slightly after I took them out of the pot, but were firm when I came back in the morning.  If the jars still pop, put them in the fridge and just eat them soon instead of shelving them.

P.S. if you want alerts on each post that I write (I try to post M/W/F), follow my blog on Facebook!

Miniature Soft Pretzels

Friday, July 22, 2011

In a recent post, I discussed food memories.  I can safely say that soft pretzels are a food in my life that may be in the top running for “Most Memories Associated”.  There are just so many varieties!  There are the soft giant thick pretzels almost like mini loaves of bread that we would get after elementary school field hockey practice in Philadelphia.  There are the Mickey Mouse shaped pretzels with cheese sauce at Disneyland, the size of your own face.  There was the soft pretzel I ate literally first thing off the train once my friends and I arrived in Germany, the home of soft pretzels.  There was also the pretzel I begged my dad to buy me from the street cart when we visited New York City when I was 12.  It tasted like burnt garbage.

Needless to say, I LOVE soft pretzels (I also love the hard sourdough ones, as well, but that’s for another post).  I don’t think I ever dreamed I would be making them at home for myself, but here we are and I just ate a pretzel made by my own hand!  As I always say, it never fails to surprise me that it was easier than expected.

Don’t be afraid of working with yeast and rising dough-you literally just mix it up and walk away from it.  How easy is that?!  So pull out some Trader Joe’s Hot and Sweet Mustard and get to making these pretzels!

Miniature Soft Pretzels
adapted from Smitten Kitchen
makes 32 miniature soft pretzels

  • 2 cups warm water (100°F to 110°F)
  • 3 tablespoons sugar
  • 1 packet active dry yeast
  • 5 to 6 cups all-purpose flour, plus more for dusting
  • 1 tablespoon salt
  • 4 tablespoons melted butter
  • 1 tablespoon canola oil
  • 1/2 cup baking soda
  • 1 egg
  • Sea salt (not table tiny grain salt!)
  1. Pour warm water and 1 tablespoon sugar into a medium bowl and stir to combine. Sprinkle with yeast (DON’T STIR-the yeast will stick to the spoon), and let sit 10 minutes; yeast should be foamy.
  2. Add 1 cup flour to yeast and mix until combined. Add salt, melted buter and 4 cups more flour and mix until combined.  Add another 1/2 cup flour and knead with your hands. If dough is sticking to your hands as you knead, add 1/2 cup more flour; knead until combined.
  3. Pour oil into a large bowl; swirl to coat sides. Transfer dough to oiled bowl. Cover with a kitchen towel, and leave in a warm spot for 1 hour (about 75-80 degrees), or until dough has doubled in size.
  4. Heat oven to 450°F.  Line two baking sheets with parchment paper (or spray with non-stick spray).  Set aside.  Punch down dough to pop bubbles. Transfer to a lightly floured board. Knead once or twice to form an evenly sized ball.  Using a chefs knife, divide the dough into 32 equal pieces (if you want larger pretzels, cut only into 16 pieces).  I make sure the pieces are equal by dividing the ball of dough into 2 halves, then divide the halves into quarters, then so on and so forth.  I guarantee your pieces will all be evenly cut this way!
  5. Let the dough rest for 15 minutes or else you will have a heck of a time trying to roll out the dough.  After the rest, on a clean separate surface, roll one piece of dough at a time into an 18-inch-long strip.  Twist into pretzel shape; transfer to prepared baking sheet. Cover with a kitchen towel.  Let pretzels rest until they rise slightly, about 15 minutes.
  6. While the pretzels are rising again, fill a large, shallow pot with 2 inches of water and bring to a boil. Add baking soda (but be warned that it will foam up and might splash up); add remaining 2 tablespoons sugar. Reduce to a simmer; transfer three to four pretzels to water. Poach 1 minute on each side.  Transfer pretzels to baking sheet. Continue until all pretzels are poached.
  7. Beat egg with 1 tablespoon water. Brush pretzels with egg glaze. Sprinkle with salt. Bake until golden brown, 12 to 15 minutes.

 Notes: Don’t put them into an airtight container until they’ve been cool for quite a while or else the pretzels will get soggy.  Also, thanks to Annie’s Eats, she figured out that you can freeze your progress at a few different points in the process.  You can freeze the pretzels after you shape them but before boiling; go straight from the freezer to the boiling water and add 15 seconds to boiling process and a few extra minutes to baking time.  You can also freeze them after baking, defrosting and reheating them without the texture suffering too much.

First Organic Produce Delivery!

Friday, July 22, 2011

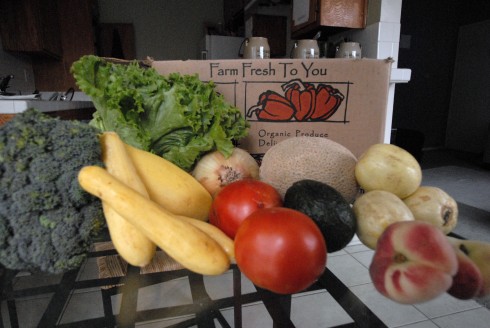
So this first post this morning isn’t a recipe; I couldn’t let the day pass without sharing the wonderful box of goodies that showed up on my doorstep yesterday afternoon!

I signed up for Farm Fresh To You, a service that delivers a box of organic local produce to your home.  Now, for months I searched for exactly this, but only found services that were too expensive and gave more produce more frequently than I would be able to eat before the next delivery.  Farm Fresh To You, however, has a LOT of things going for it:

  • You can choose to get deliveries every week, every other week, or every 3 or 4 weeks.
  • You can choose the size and variety of your box-small, regular, large sizes and you can choose to get just fruits, just veggies, both, or even options beyond those, like only “grab and go” fruits and veggies that you can pick up on the way out the door and eat just with your hands.
  • You can choose what exactly comes in your box.  I know some people might think this is cheating since, after all, part of the fun is figuring out how to use the produce that week.  But there are some people with allergies (I should have said no apples, since I am indeed allergic to apples, but I love cooking with them and giving the treats away) and there are some people who don’t want to let food go to waste if they already know they will not eat them (I, admittedly, said no beets and no celery).

So back to the first box:  it was a bumper crop!  1 head of green leaf lettuce, 3 stalks of broccoli, 2 slicing tomatoes, 1 yellow onion, 1 pound of yellow squash, 1 avocado, 1 cantaloupe, 2 doughnut peaches, and 1 pound of lemon cucumbers.

If any of you out there have ever had a lemon cucumber, then you had me beat.  I’d never even heard of them!  Turns out they look like a small yellow tennis ball, but taste exactly like your average every day cucumber.  The only difference is that the skin is just ever so slightly tougher-but we ate the skins anyway and only barely noticed them.  What an experience!

I absolutely suggest you find a service like this in your area.  You may be surprised to find that they do exist in your area, especially since the locavorism trend has begun to take off in popularity.  I can say this much…you guys will definitely benefit from these produce deliveries.  My head is already churning with recipe ideas for how to use everything!  Except the peaches-those will be a delightful little breakfast on the way to the office tomorrow.

Bonus-if you live in California, check out the Farm Fresh to You website and see if they deliver to your zip code.  If you want to give Farm Fresh to You a try, use code “6164″ for $5 off your first box. Mention my name and I get a treat too!

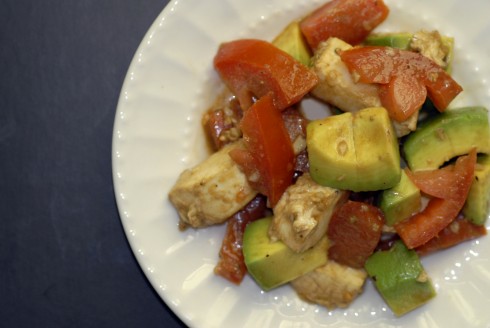
Tomato Mozzarella Avocado Salad

Wednesday, July 20, 2011

It is a decided fact that you cannot take a good photo of beautiful, snow white mozzarella once it’s been tossed with balsamic vinegar.  The good news is, this salad is DELICIOUS.  It’s what got me eating avocado finally after a good two years of living in California and turning my nose up the stuff.  It also got my roommate eating tomatoes, so I’m pretty sure this salad has secret magic in it.

Best of all, it can be thrown together in the miniscule time it takes you to chop up 4 little ingredients.  I was so hungry when I got home from yoga last night that I was literally was “throwing” the salad together.  It was as if there was a race between me and my stomach-if I win, I get fed, if my stomach wins, I die of starvation.

That all said, this is delicious Californian start to any meal or a meal in itself and shows off the best of California summer produce.

Tomato Mozzarella Avocado Salad
serves 2-4 as a side

  • 1 ripe tomato
  • 1 ripe avocado
  • 3 golf ball sized fresh bocconcini or a handful of smaller sized mozzarella balls, the kind found in a container of water
  • 3 cloves of raw garlic (this will make for a spicy salad, which is delicious, but you can adjust to your own taste)
  • balsamic vinegar
  • olive oil
  • salt & pepper

…I’m not sure instructions can get any easier than this….

  1. Chop tomato and avocado; toss into bowl (for full disclosure…I get rid of the tomato seeds…they’re a culinary pet peeve of mine)
  2. Chop bocconcini into bite sized pieces, if using small mozzarella balls, slice in half; toss into bowl
  3. Finely chop garlic cloves; toss into bowl
  4. Drizzle contents of bowl with 2 parts balsamic vinegar and 1 part olive oil
  5. Salt & pepper to taste
  6. Enjoy!

Old-Fashioned Chocolate Cake

Monday, July 18, 2011

I know you guys love my true confessions and, well, I have two of them for you tonight:

True Confession #1: Clearly I’ve been on a bit of an unhealthy streak lately, what with the pound cake and now this.  I’ve had a craving for chocolate cake recently (and I’m not even a big chocolate lover so a chocolate craving for me is a serious situation) but have no fear, I’m back to normal after this cake.  We’ll have a good variety of healthier stuff coming up here.

True Confession #2: I royally screwed up the frosting recipe.  Let this be a lesson to you all: don’t rush through your cooking!  It should be a relaxed time for you to enjoy making some good nourishment (or a nice treat) for your body, not a rushed experience.  This cake was certainly one of those where you dirty a ton of bowls and go through more steps than you realized you might need to take, including 2 different trips to the grocery store on my part- MID-BAKING no less.  Me, the genius, started baking a layer cake before I realized that I don’t even own cake pans. Cupcake tins (mini AND regular), a loaf pan, an angel food tube pan, baking sheets…but no cake pans.  Then, during my candy blitz last month, I used up all of my corn syrup and forgot to replace the bottle.  Then, after the cake was baked, frosted and all was said and done, I open up the fridge and what do I see there?  The cup of heavy cream I had carefully measured out and put back in the fridge because the recipe specified it should be chilled.  I completely skipped over the recipe instruction to add it to the frosting! Even though my roommate and her boyfriend both said how much they loved the frosting before I discovered my mistake, I’ve included the proper recipe below so you can pull if off correctly.  Unfortunately, I’m not making a second cake just to get the frosting right.  See True Confession #1 as to why.

Ingredient Note: Per Cook’s Illustrated‘s suggestion, I always use Ghiradelli semi-sweet/bittersweet/unsweetened chocolate bars for my baking.  I never have a problem finding them at my grocery store.

Old-Fashioned Chocolate Cake
Source Cook’s Illustrated March 2006

Cake

  • 12 tablespoons unsalted butter (1 1/2 sticks), very soft
  • 1 3/4 cups unbleached all-purpose flour, plus extra for dusting pans
  • 4 ounces unsweetened chocolate, coarsely chopped
  • 1/4 cup Dutch-processed cocoa
  • 1/2 cup hot water
  • 1 3/4 cups sugar
  • 1 1/2 teaspoons baking soda
  • 1 teaspoon table salt
  • 1 cup buttermilk
  • 2 teaspoons vanilla extract
  • 4 large eggs
  • 2 large egg yolks

Frosting

  • 16 ounces semisweet chocolate, finely chopped
  • 1 stick unsalted butter
  • 1/3 cup sugar
  • 2 tablespoons corn syrup
  • 2 teaspoons vanilla extract
  • 1/4 teaspoon table salt
  • 1 1/4 cups heavy cream (cold)

Instructions for Cake:

  1. Adjust oven rack to middle position; heat oven to 350 degrees. Grease two 9-inch-round by 2-inch-high cake pans with butter or non-stick baking spray; dust pans with flour and knock out excess.  Set a large pot with 1″ water in it to a simmer.
  2. Combine chocolate, cocoa powder, and hot water in medium heatproof bowl; set bowl over the simmering water, resting on top of the pot.  Stir with rubber spatula until chocolate is melted, about 2 minutes-mixture will be dry and a bit grainy (you’re going to wonder how it will ever make a delicious cake and then, like magic…).  Add 1/2 cup sugar to chocolate mixture and stir until thick and glossy, 1 to 2 minutes. Remove bowl from heat and set aside to cool.
  3. Whisk flour, baking soda, and salt in medium bowl. Combine buttermilk and vanilla in small bowl. In another medium bowl, whisk eggs and yolks on medium-low speed until combined, about 10 seconds.  Add remaining 1 1/4 cups sugar, increase speed to high, and whisk until fluffy and lightened in color, 2 to 3 minutes.
  4. Add cooled chocolate mixture to egg/sugar mixture and mix on medium speed until thoroughly incorporated, 30 to 45 seconds, pausing to scrape down sides of bowl with rubber spatula as needed. Add softened butter one tablespoon at a time, mixing about 10 seconds after each addition.
  5. Add about one-third of flour mixture followed by half of buttermilk mixture, mixing until incorporated after each addition (about 15 seconds). Repeat using half of remaining flour mixture and all of remaining buttermilk mixture.  Scrape down sides of bowl and add remaining flour mixture; mix at medium-low speed until batter is thoroughly combined, about 15 seconds.  Divide batter between two 9″ cake pans and tap pans lightly on counter top to release any air bubbles hiding in the batter.
  6. Bake cakes until toothpick inserted into center comes out with a few crumbs attached, 25 to 30 minutes. Cool cakes in pans 15 minutes, then invert onto wire rack. By cooling them upside down on the racks, they will flatten out a bit so you’ll have an even cake.  Cool cakes to room temperature before frosting, 45 to 60 minutes.

Instructions for Frosting:

Note: Most of us have a limited number of mixing bowls and heat-proof mixing bowls at our disposal (I was certainly rushing around transferring ingredients and washing bowls at the last second because I realized I needed one for a task but it was full of, say, sugar or something), so follow the instructions when it says what size bowl to use-I’m just trying to save you some stress and dishpan hands later.

  1. Using the same technique to melt chocolate, heat another 1″ of water to simmering in pot from the beginning of the cake recipe.
  2. Melt chocolate in medium metal bowl set over pot of simmering water, stirring occasionally until smooth. Remove from heat and set aside. Meanwhile, heat butter in small saucepan over medium-low heat until melted. Increase heat to medium; add sugar, corn syrup, vanilla, and salt and stir with heatproof rubber spatula until sugar is dissolved, 4 to 5 minutes. Add butter mixture and cream (this is where I forgot about it) to the chocolate already in the medium metal bowl and stir to thoroughly combine.
  3. In large metal bowl, add a tray or two of ice to water to create an ice bath for the frosting.
  4. Place medium bowl of frosting mixture into the ice bath and stir mixture constantly with rubber spatula until frosting is thick and-this is the annoying part-until frosting is 70 degrees.  5 degrees too cold and it won’t be creamy.  5 degrees too warm and it won’t set when you whip it in a moment.
  5. Once frosting reaches 70 degrees, beat on medium-high speed until frosting is light and fluffy, 1 to 2 minutes. Stir with rubber spatula until completely smooth.
  6. To frost the cake, prepare your cake stand or cake plate first: tear off 4 pieces of wax paper or tin foil about 4 inches long and arrange them in a square around your plate.  Place the first cake on the plate, making sure the area in the middle of the plate where the wax paper or tin foil meet are completely covered by the cake.  Frost the top of this first layer, then place the second layer on top of the first and frost the top and sides of the layer cake.  To make the cute swirly pattern, I took the back of a spoon and, with a light and quick touch, made swirly patterns, one swoop at a time with the spoon.

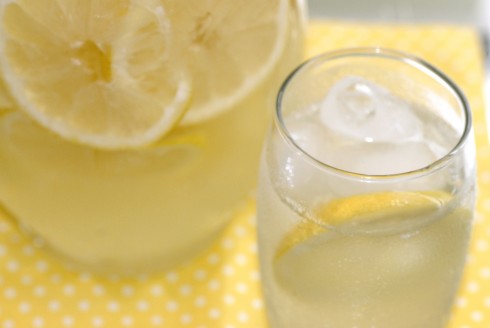
Fresh Lemonade

Friday, July 15, 2011

You know it’s truly Summer here in SoCal when I get in my car to leave work in the Valley at the end of the day and my car thermometer says “108″.  Then, as I drive down the 405 freeway over the hill towards home, it never fails to amaze me as I watch my thermometer tick down 30 degrees or more until it says “71″ or so by the time I’m home in Beach-town.  What I wouldn’t give for an ice cold pitcher of lemonade while I’m at the office!  My friends scoffed at me using a recipe for lemonade (“It’s just water and lemons and sugar!”) but this recipe definitely includes a few key steps to making lemonade the best it can be.

This recipe is from one of my favorite cookbooks of all time: The Little House Cookbook.  If you are, or were ever, a fan of Laura Ingalls Wilder’s Little House on the Prarie series and you love cooking food or just reading about it, go find this book!  Part cookbook, part food history, part excerpts from the series, it’s held a cherished place on my bookshelf for as long as I can remember and sometimes I pull it down just to read for fun because, naturally, all of my favorite parts of that series had to do with food.

Fresh Lemonade
Recipe from The Little House Cookbook

  • 5 large lemons
  • 1 1/2 cups sugar
  • Ice
  1. If you’re lucky enough to have lemons picked straight off a tree into your kitchen, just give them a good scrub down.  If you’ve bought supermarket lemons (no shame in that!), boil a pot of hot water, put the lemons in a bowl and pour the water over the lemons so they are covered.  Let stand for a few minutes.  This will do two things for your lemons: melt off the wax that the grocery store put on them to make them shiny and it will make them juicier.  No lie, I have NO idea how it makes them juicier, but I can say that it certainly does, because I’ve seen it with my own eyes.  After a few minutes, pull each lemon out, drying it by rolling it in a towel on your counter, pressing as you do it, to release more juice.
  2. Slice the lemons into thin slices-as thin as you can go without making yourself crazy, about 1/4″.  Try to use a cutting board that will catch the lemon juice so you can just pour it in to the bowl instead of losing all that deliciousness.
  3. In a large bowl or baking dish, arrange a layer of lemon slices, liberally pour sugar over the layer, then add another layer of lemon slices and repeat until all lemons and sugar are used up.  Let the mixture sit for 30 minutes (the time will go quickly, I promise!).
  4. Using a wooden spoon or wooden spatula, press down on the lemons as best you can without pulverizing the slices, so your lemonade isn’t full of pulp.
  5. Pour contents of bowl into a pitcher and fill pitcher with cold water.

Served over ice, it doesn’t get more refreshing than this!  Of course, you can tailor the recipe to be more more or less sweet or tart by adjusting the amount of sugar used.  Drink up!

Skillet Glazed Drumsticks

Thursday, July 14, 2011

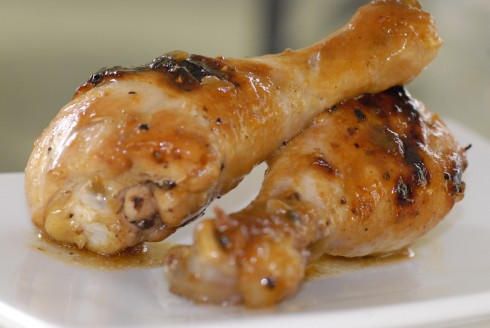
True Confession:  I love buying rotisserie chickens from the grocery store.  They’re fast and delicious and so easy after a long day at work.  But sometimes you want something a little more interesting and this recipe is just the trick!  If you’ve never pan-roasted before, you are in for a treat-you get the delicious browned outside of the chicken from cooking it in the skillet on the stove-top, yet popping it in the oven to finish cooking means you’re going to still end up with moist chicken.  Don’t let the presence of jalapeno jelly make you think this is a spicy dish-unless you add a lot of hot sauce.  In the end, I could barely taste any spicy heat at all!

Before we go any further, make sure you have a large skillet that is able to go in the oven.  That means no plastic handles and, just because it seems like a good idea, I try not to put non-stick pans in the oven.  Who knows what chemicals were used to make it non-stick and I’d rather not have that melting into my food.  I will warn you that while certain ingredients aren’t exactly fun to work with (cleaning out a raw chicken, for example), I never really am completely grossed out by them.  That said?  Jalapeno jelly was disgusting!  and I normally love jalapenos!  ….have I whet your appetite yet?  The end product here is delicious, though, so just dive right in and go for it because you’ll love what you’re eating for dinner-not your average chicken dish!

Skillet Glazed Drumsticks
recipe source: America’s Test Kitchen 30 Minute Suppers Summer 2010
Serves 4

  • 3 tablespoons jalapeno jelly
  • 1 teaspoon grated zest and 2/3 cup juice from 2 large oranges
  • 1 shallot, minced
  • hot sauce
  • 2 tablespoons molasses
  • 1 teaspoon cornstarch
  • 8 chicken drumsticks (about 3 pounds)
  • salt and pepper
  • 2 tablespoons vegetable oil
  1. Adjust oven rack to middle position and heat oven to 450 degrees.  Combine jelly, orange zest and juice, and shallot in small saucepan, add a few dashes of hot sauce to taste.  (I probably put in a teaspoon or so and could barely taste any spice at all.)  Whisk in molasses and cornstarch.  Simmer mixture over medium heat until thickened, about 5 minutes.
  2. Meanwhile, pat chicken dry with paper towels and season with salt and pepper.  Heat oil in large skillet over medium-high heat until just smoking.  Cook chicken, turning once or twice, until well browned.
  3. As best you can manage it without dumping the chicken out of the pan too, pour off remaining oil.  Pour the heated glaze over the chicken in the skillet, turning chicken until thoroughly coated.  Transfer skillet to oven and roast until chicken registers 175 degrees, 20 to 25 minutes, flipping chicken halfway through.
  4. Transfer chicken to platter, season glaze with salt and pepper to taste, and pour glaze over chicken.

Grandmother’s Southern Poundcake

Monday, July 11, 2011

Handing down family recipes is an important tradition all over the world.  I admit, I’ve not been a big collector of heirloom recipes, but the more I cook, the more I’m realizing I should be.  We all have certain cherished food memories and one of the strongest food memories I have of visiting my grandmother’s house in Georgia (aside from the Lima beans, which I still love) is her pound cake.  I would reach into the big flip top storage freezer and pull out slices of pound cake, scarcely being able to wait even a few minutes before getting another.  When discussing this with my mother in recent weeks, the part I told her I remember most wasn’t the flavor or the texture, but actually the crust-so naturally, the first test as to whether or not I pulled this family recipe off correctly was the sweet crunchy crust.  I’m pleased to say it was a success!  The cake flour gives it an extremely fine crumb that is strangely dense and impossibly light and airy at the same time.  Of course, the crust was just as I remember it.

Like all southern recipes, it’s not for the faint of heart when it comes to healthy eating, but treat this recipe with gentle love and respect-it’s a true heirloom!  The recipe that follows is almost exactly as my Grandmother wrote it down on her recipe card.

Note:  Mom thinks the “secret” ingredient to the pound cake is the added flavorings.  The original recipe calls for McCormick’s Vanilla Butter & Nut flavoring (actually written by Grandmother as “Butternut Flavoring”).  When I couldn’t find it in my grocery store here in SoCal, I called McCormick’s only to be told they don’t sell it within 100 miles of me!  They also told me it was a unique flavoring and nothing could be substituted, but of course, I wasn’t going to let that stop me.  I’ve included the measurements for both the original flavoring, if you can find it (likely if you’re in the South), and my substitution.

Also, in a bid for true authenticity, I purchased an angel food cake tube pan just for this recipe.  I’m sure you could substitute a different pan, filling each pan 2/3 of the way and adjusting the baking time.  This recipe does make a lot of batter, so you will likely have to bake two separate cakes if you use something smaller.

Grandmother’s Southern Pound Cake

  • 1  8 oz package cream cheese
  • 3  sticks butter
  • 3  cups sugar
  • 6  eggs
  • 3  cups cake flour
  • dash of salt
  • 1  teaspoon vanilla butternut flavoring OR
  • 1/2 teaspoon vanilla extract + 1/2 teaspoon butter flavoring + 1/4 teaspoon almond flavoring
  1. Preheat oven to 325 degrees
  2. Cream together cream cheese, butter and sugar
  3. Add eggs, one at a time, mixing well after each egg
  4. Fold in flour and salt a little at a time
  5. Add flavorings
  6. Pour batter into an angel food cake tube pan and bake for 1 1/2 hours; it should be golden brown on top and the crust will likely be cracked in a perfect ring right around the middle.

The cake is good for eating just by itself but I think it is truly perfect when served with strawberries and whipped cream (I think I ate this exact thing for dinner all last week…)