Entries from August 31st, 2011

Roasted Carrot Soup

Wednesday, August 31, 2011

Last week I received a big, beautiful bunch of carrots in my CSA box and I hadn’t the slightest idea what I wanted to do with them.  When I say “big, beautiful” I don’t mean they were just a gorgeous bright orange, which they were, but they had giant green tops on them that were three times the size of the carrots themselves.  I’d never seen carrots like this!  It makes you realize how artificially manicured the carrots are in the supermarket and that we should probably think just a little bit harder about where your food comes from.  Do you want something that came straight from the ground, grown by a farmer who cares about his crops or something that was spit out from a machine?

That all said, I hadn’t the slightest idea what to do with this bunch of carrots.  It took a week and then some, but I finally realized exactly what I wanted: despite it still being a hot summer here in Beachtown, CA, I wanted Roasted Carrot Soup.  Roasting brings out the sweetness in carrots and even the sweetness in the onions in the soup, too (if you know me, I hate onions but loved them in this soup; a testament to the great recipe).  I was surprised at the lack of spices in this soup, save for the standard salt and pepper plus a little garlic and bay leaf.  Roasting the vegetables absolutely gives all the complex, nutty, spicy flavor the soup might need without all the extra spices.

I think the best testimony, however, comes from the boyfriend eating the soup, who had been rather blase about my making it: “I knew it would be okay, but I didn’t know it would be THIS good!” So make it now while the carrots are fresh and local or save this recipe for the Fall when you need to warm up over something hearty.

Note: I tried using my food processor to slice the carrots, but it was an experiment gone wrong.  Wish I had used my mandolin slicer instead!

Roasted Carrot Soup
Makes 3-4 bowls of soup
Recipe adapted from Cooks Illustrated, Nov 2007

  • 1 1/2 pounds carrots (about 8 medium), peeled and sliced 1/2 inch thick
  • 1 medium onion, halved and sliced 1/2 inch thick
  • 2 teaspoons olive oil
  • salt
  • 4 garlic cloves, minced
  • 1/4 cup dry white wine
  • 1 bay leaf
  • 1 1/2 cups low-sodium chicken broth
  • 1 1/2 cups low-sodium vegetable broth
  • 1/2 cups half-and-half
  • Ground black pepper
  1. Adjust an oven rack to the middle position and heat the oven to 450 degrees. Spread the carrots, onion on a rimmed baking sheet in an even layer, drizzle with olive oil and sprinkle with salt. Roast until the vegetables are well browned and softened, stirring occasionally, 25 to 30 minutes.
  2. Transfer the roasted vegetables to a large saucepan. Add the remaining 1 teaspoon oil, cover, and cook over medium-low heat, stirring often, until the carrots soften further, 3 to 5 minutes. Add the garlic and cook until fragrant, about 30 seconds. Stir in the wine and bay leaf; cook until the wine has reduced by half, about 1 minute. Add the broths. Bring to a boil over medium-high heat; cover, reduce the heat to medium-low and simmer until the soup is flavorful, about 5 minutes.
  3. Remove the bay leaf and puree the mixture in a blender until smooth (I have a stick blender that I swear by).  Add the half-and-half and warm over low heat until hot, about 3 minutes. Season with salt and pepper to taste (although mine did not need any salt whatsoever, just the pepper).  I sprinkled a little bit of thyme over my bowl of leftover soup, but it’s good with or without it!

Almond Bliss German Chocolate Cake

Monday, August 29, 2011

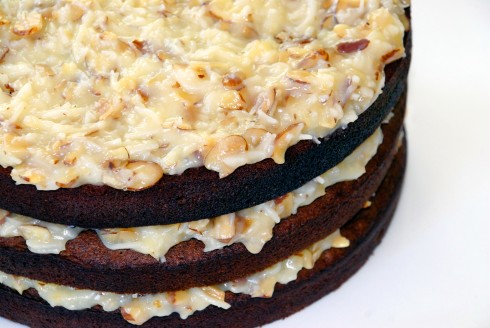
I’ve always been hesitant to make a German Chocolate Cake because they’re not really my favorite flavor combo for cake and, quite frankly, I don’t think they look very pretty.  This being an assignment for Project Pastry Queen, I plowed ahead, hoping against hope that I would be able to create a cake worthy of posting…and well…here I am, so it all worked out for the best!

Let me start out by saying something Big and Important: this is my new go-to chocolate cake recipe.  I can take or leave the coconut custard icing that makes it an official German Chocolate Cake because it’s just not my favorite type of icing for a cake.  This is no Devil’s Food Cake, but it’s the perfect every day chocolate cake-soft, moist, and full of strong chocolate flavor.  I can’t wait for the next time I need chocolate cupcakes or a cake for a party, because I know I won’t have to scour over recipes and hope that the recipe I choose turns out okay.  If you do like coconut, this is a slightly different filling recipe as it utilizes cream of coconut for an extra punch of flavor and almonds instead of pecans.  I did like it in the end and, while not my favorite, it’s certainly a great recipe to have in your box if you love German Chocolate Cake!

In an interesting tidbit for the morning, Rebecca shared that German Chocolate Cake isn’t actually from the country of Germany, but from Texas and named for the brand name “German” chocolate.  Who knew!

Notes: Again, I left out the chocolate chips.  1 3/4 cups stirred in at the end if you want them.  Rebecca also uses almonds in place of the typical pecans, but I’m sure you can substitute pecans back in if you would prefer.  You’ll need three 9″ cake pans, which was a surprise since I only had 2 pans.  Also, make sure you have plenty of eggs on hand-you’ll need a total of 9!

Almond Bliss German Chocolate Cake
Recipe from The Pastry Queen


Cake

  • 8 oz bittersweet chocolate, chopped into small pieces
  • 1/2 cup boiling water
  • 1 cup (2 sticks) unsalted butter, at room temperature
  • 2 cups sugar
  • 4 large eggs, separated
  • 1 teaspoon baking soda
  • 1 cup buttermilk
  • 2 1/2 cups all purpose flour
  • 1/2 teaspoon salt
  • 1 tablespoon vanilla extract

Custard Icing

  • 1 1/2 cups sliced almonds
  • 1 cup milk
  • 1 1/2 cups sweetened cream of coconut (I found a bottle in the alcohol section next to the rum, since it’s used in pina coladas)
  • 1/2 stick unsalted butter
  • 5 large egg yolks
  • 3/4 cups sugar
  • 3 tablespoons cornstarch
  • 1 1/2 cups sweetened shredded coconut
  1. Place one baking rack 1/3 from the bottom of the oven and the second 2/3 from the bottom.  Preheat the oven to 350 degrees.  Line the bottom of three 9: cake pans with parchment paper rounds, grease with butter and dust with flour.
  2. Place the chopped chocolate into a small bowl and pour the boiling water over the chocolate.  Stir until it is melted completely into a smooth sauce.
  3. In a large bowl, beat butter and sugar on medium for 2 minutes.  Add the egg yolks and beat for another minute.
  4. In a bowl, add the buttermilk and baking soda, stirring until it dissolves.  The buttermilk will gently foam up and double in volume, so be sure your bowl is big enough.
  5. Add half the buttermilk mixture to the butter-sugar-egg yolk mixture, beat on low until incorporated, then add half of the flour, beat, then the rest of the buttermilk and the rest of the flour, beating after each addition.
  6. Using a spatula, stir in the salt, vanilla, and melted chocolate.  (Stir in chocolate chips, if using.)
  7. In a clean medium bowl, beat the egg whites on high speed, until soft peaks form.  Gently fold the egg whites into the chocolate batter.
  8. Spoon the batter evenly into the prepared cake pans.
  9. Staggering the cake pans in the oven, put two on the top rack with lots of space in between, and the third on the bottom rack in the middle.  Bake for 30-35 minutes until an inserted toothpick comes out clean.  Keep an eye on them, as they could rise strangely (mine were most definitely lopsided) or the pans could finish baking at different times.
  10. After coming out of the oven, transfer pan to wire racks and after 5 minutes, take the cakes out of the pans and put them upside down directly on the wire racks (that should help them to even out if they rose unevenly).
  11. While the oven is still hot, spread the almonds evenly onto a rimmed baking sheet and toast the almonds for 5 to 7 minutes until golden brown.
  12. Heat the milk, cream of coconut and butter in a saucepan over medium heat utnil the butter has completely melted.
  13. In a medium bowl, whisk the egg yolks, sugar and cornstarch until smooth.  Pour 1 tablespoon of the hot milk mixture into the whisked egg yolk mixture and whisk until fully incorporated.  Repeat two more times (we’re warming the egg yolks up, “tempering them”, so that when we add them to the milk they don’t immediately curdle up into scrambled eggs).
  14. Slowly pour the tempered yolk mixture into the hot milk mixture, which still is over medium heat, whisking constantly.  Whisk constantly for 7-10 minutes until the mixture thickens and looks spreadable.  This happened at exactly the 7 minute mark for me, but I kept going for a few more minutes just in case.  I would rather have slightly over done frosting than frosting that just dribbled down the sides of the cake!
  15. Stir the shredded coconut and the toasted almonds into the custard mixture.  Let the icing cool for at least 15 minutes.
  16. If your cake layers aren’t exactly even, as mine weren’t, you can take a serrated knife and cut the tops off so that they lay flat when stacked.  Bonus:  the tops you cut off are all yours to eat!
  17. Put one layer of cake on the plate, spread icing on top, and repeat with the other layers-I put the top layer on upside down so that the perfectly flat side was facing up.  It was a prettier surface for laying down icing on.  Do not frost the sides of the cake, and you’ll have a surprisingly beautiful specimen of a German Chocolate Cake!  I think leaving the sides clean goes a long way towards avoiding the sticky gloppy mess you usually see of German Chocolate Cakes.
  18. Rebecca suggests you wrap the cake well if you don’t plan to eat it within 3 hours.  I say, see how long it lasts!

Fried Yellow Squash

Friday, August 26, 2011

Food Memory #2,398: Fried Squash.

Mom is a pro at yellow squash.  Her squash casserole is one of the most requested dishes at family gatherings and fried squash is something that would always draw my sister and I to the stove as it was frying.  Mom would pull them out of the hot oil, lay them on a paper towel lined plate or a paper bag and season them.  I would pop them into my mouth long before they were cool enough to actually be edible, never learning and burning my mouth ten times over.  While grilled squash is a treat for sure, I think fried squash has to be my all time favorite.  I know that the boyfriend and I wolfed the whole batch down way too fast and were left wishing there was much more.  Take advantage of the bounty of summer squash right now before it’s gone and create a new food memory for your own home!

Fried Yellow Squash

  • 1 lb yellow squash
  • 16 oz milk
  • 1 1/2 cups flour
  • salt & pepper
  • oil for frying (peanut oil is by far the best for frying, but it’s more expensive)
  1. Heat about 2 inches of oil in a heavy pan.
  2. While the oil is heating, pour the milk into a bowl and set it next to your cutting board.
  3. In a separate bowl, add the flour and season with salt and pepper, about 1 teaspoon of each, and stir.
  4. Slice the squash into 1/4 inch slices and drop them into the bowl of milk as you go.
  5. Once the oil is hot enough, drop the milky slices of squash into the flour mixture and toss until coated thoroughly.
  6. Gently drop the slices into the oil, a few batches at a time-make sure that all of the slices in the oil have room to float on the top of the oil.
  7. Pull the slices out when they are golden brown and place on a plate lined with a stack of 6 or so paper towels and season with salt and a little additional pepper.

I remember Mom would dirty one less bowl by putting the flour mixture in a large plastic bag, add the squash, and shake it all up until the slices were all evenly coated.  I didn’t remember until I was tossing the slices in the bowl and felt like something wasn’t quite right in my methods…of course either method you use will be delicious!

Lemon Cheesecake Cheese Ball

Wednesday, August 24, 2011

The last of my party recipes for now and, admittedly the second cheesecake recipe in a row, but this one is a great way to have a dessert on the buffet table that takes literally minutes to throw together the night before.  And who doesn’t like cheesecake?  So I think you’ll forgive me for the cheesecake overload this week.  Also, this is a completely different take on cheesecake as it doesn’t have to be dessert-it’s not heavy at all so you can have it as a lightly sweet appetizer on the brunch table or party buffet.

Definitely make this the night before as it needs to chill in the fridge for a few hours first.  Also, make sure that when you’re crushing up the graham cracker crumbs the next day, you’re not rushing to get stuff done before guests arrive-I was (when am I not frantically running around?) and 5 minutes before my guests came, my rolling pin slipped and accidentally flung graham cracker crumbs all over the entire kitchen and the girls showed up to me frantically sweeping up the kitchen floor and counters.

Regardless of the easily avoidable mess, this recipe is practically the opposite of Monday’s recipe-instead of dark strong chocolatey coffee flavors, this one is light and refreshing and perfect for an end of the summer party.

Lemon Cheesecake Cheese Ball
Adapted from Annie’s Eats

  • 10 oz. cream cheese
  • 2½ tbsp. sugar
  • Zest of 1 large lemon
  • 4 tsp. freshly squeezed lemon juice
  • 3 graham crackers
  1. Mix cream cheese and sugar together-though it will be more like mushing together and less like stirring.
  2. Mix in lemon zest and lemon juice
  3. Place a piece of plastic wrap on the counter and spoon the mixture into a little heap in the center.  Fold the wrap over the mound and shape the mixture into a ball shape.
  4. Refrigerate for at least 3 hours, overnight is fine and reshape if necessary when you pull it out.
  5. Crush the graham crackers into fine crumbs and roll the ball in the crumbs until evenly coated.  If necessary, take pinches of the crumbs and gently press them in to any spots that look a little bare.
  6. Serve with sliced fruits (I liked it with green apples and nectarines) and, my personal favorite, Nilla Wafers.

Cappuccino Cheesecakes

Monday, August 22, 2011

First, a short programming note-my apologies for the missing post on Friday!  I was out of town and had set up a post to automatically publish on Friday morning but I missed a button somewhere and it didn’t get posted for you.  I’ll save it for later this week!  And on to our regularly scheduled programming…

Another entry for Project Pastry Queen, this is without a doubt my favorite recipe from the cookbook so far and possibly my new favorite cheesecake recipe. Granted, I’d never made cheesecake before this recipe, but I think these individual cheesecakes are perfect in every way. They’re small enough that you have automatic portion control. They’re not giant thick layers of cheesecake, but instead surprisingly thin-and surprisingly, the perfect amount. You’ll find yourself satisfied but without indulging in the thousands of calories you might with a normal sized slice. The crust is crunchy, chocolatey, and buttery and is in perfect ratio to the filling. You can’t beat the cappuccino-chocolate flavor combination and the silky chocolate ganache on top is just to die for!

Long story short: do not pass go, do not collect $200. Go directly to the kitchen and make these cheesecakes!

Note: I went to a few different fancy food stores looking for the tins for this recipe before finding exactly what I needed at my local big grocery store.  The tins you want are just the cheap aluminum foil pans, about 5″ across.  The ones I found came in a pack of 3, with big clear plastic lids for each tin (VERY handy for transporting to work the next day for our picnic!) and were labeled “pot pie pans”. 

Also, my true confession for this week from yours truly: I don’t actually like chocolate chips in desserts unless they’re melted and gooey in chocolate chip cookies.  Even then, I go for the cookies with fewer chips.  As such, I left the chocolate chips called for in this recipe and didn’t miss them one bit.  I think they would have interfered with the rich, smooth texture and the ganache more than makes up for any potential lack of chocolate. If you want to add them, stir 1 cup of semi-sweet chocolate chips into the filling batter just before baking.


Cappuccino Cheesecakes
Makes 8 Individual Cheesecakes
Adapted from The Pastry Queen

Crust

  • 1 package (16 oz) Oreos
  • 1 stick (1/2 cup) unsalted butter, melted

Filling

  • 2 teaspoons instant espresso powder
  • 1 tablespoon boiling water
  • 2 packages (8 oz) cream cheese, at room temperature
  • 1 cup sugar
  • 1/4 teaspoon salt
  • 3 large eggs

Ganache

  • 4 oz bittersweet chocolate (my suggestion: 1 bar of Ghiradelli)
  • 1/2 cup heavy whipping cream
  • 2 tablespoons light corn syrup
  • 1 teaspoon vanilla extract
  1. Preheat oven to 350 degrees.  Put the cookies in a food processor and pulse until all the cookies are now just crumbs.  Pour the melted butter in and pulse until butter is fully combined.
  2. Press the cookie-butter mixture into the bottom and about an inch up the sides of the pans.  There should be just enough cookie mixture for the 8 tins.  Set tins aside.
  3. In a small bowl, combine espresso powder with the boiling water and mix.
  4. In a large bowl and using an electric mixer, combine the cream cheese, sugar, salt and coffee mixture.  Add the eggs all at once and beat on medium about 1 minute.
  5. Pour the cream cheese mixture over the chocolate crusts.  I think I used a 1/3 measuring cup and did a scoop of batter for each tin.  You want to leave just a little space between the top of the batter and the top of the crust because you need room for the ganache to sit on top later.
  6. Bake the cakes for 35 minutes until the filling is set.  Cool for 20 minutes while you make the ganache.
  7. Now I’m going to tell you a story right here in the middle of the instructions.  There once was an impatient baker named Emily, who ruined her ganache at 10:30 at night and had to go buy another chocolate bar to finish her recipe before taking it to work the next morning for a picnic.  Do not be as impatient as Emily!  Basically, I thought I knew what I was doing, heated the milk too hot and dumped the chocolate into the milk instead of what the instructions said.  I ended up with a clumpy greasy mess instead of the silky gorgeous ganache I was supposed to have.  Second try was beautiful, because I followed the instructions.
  8. Chop the chocolate into small pieces and put them in a medium bowl.
  9. Heat the cream in a small sauce pan until it is hot and just beginning to steam.
  10. Pour the hot cream over the chocolate in the bowl and stir until it is completely melted.
  11. Stir in corn syrup and vanilla.  Let cool for a few minutes.
  12. Using a normal spoon, I carefully poured a couple of spoonfuls of ganache over each cheesecake.  Gently tilt the tins back and forth and around to make sure the ganache spreads and covers the whole top so that no cheesecake is showing through the top or around the edges.
  13. Refrigerate for at least 4 hours or up to 3 days.
  14. You can pop the cheesecakes out of their tins to serve or, as I did, cut them into 4 wedges and let people take a wedge as they please.

Good Eats for Cheap: The $5 Challenge Pot Luck!

Thursday, August 18, 2011

Emily here, with a special announcement!

I’m pleased to be taking part in the “$5 Challenge”-an event taking place across the country because (as they so perfectly worded it): “slow food shouldn’t have to cost more than fast food.”

I will be hosting the event at a lovely little park in Santa Monica and encourage anyone in the LA area to join me.  I’ve capped the attendance at 15 people, so hurry up and RSVP already!

Each person should bring a dish that cost them $5 or less to prepare.  We know it’s possible; just use your noggin!  The good news is, this is one challenge that is really worth thinking through, as I know I’m guilty of occasionally grabbing a drive-thru taco because it costs less than a dollar and then trying to convince myself that I hit all the proper food groups: veggies (unripe tomatoes and pathetic lettuce), dairy (sour cream, processed cheese), protein (mystery meat), whole grains (the taco shell LOOKS like whole grain, right?).  Let’s prove to ourselves that we can eat a lot healthier than this for just as cheap!

To join me on September 17th for my $5 Challenge Pot Luck, RSVP at this link: http://donate.slowfoodusa.org/goto/emilyb

If you can’t join me, host your own dinner!  It can be a pot luck like mine, you can make a big dinner for a church group or school group and charge people $5 at the door, or you can just pledge to cook your family a healthy dinner that night that costs $5 or less per person.  Or hold cooking lessons and teach a healthy menu for less than $5 a person!  What ever you choose to do, PLEDGE HERE that you’ll take the challenge even just for yourself one night, or register your event (publicly, so others can join you or privately, for just your friends or family) on the $5 Challenge registration website.

French Cruller Doughnuts with Maple Vanilla Bean Glaze

Wednesday, August 17, 2011

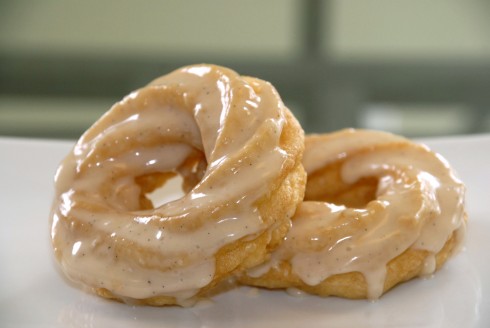
Who on earth thought you could make doughnuts at home?  I always just thought they were something that magically appeared in boxes labeled “Krispy Kreme” on Sunday mornings.  Even once I actually went to a Krispy Kreme store and saw the factory machine churning out glazed doughnuts, it still felt more like a Disneyland attraction than actually connecting in my brain as the creation of food I was about to eat, much less food that I might be able to make at home myself.

I can’t remember how I came across this recipe on a great blog, Not So Humble Pie, for French crullers, but I do know that something struck me about this recipe.  It was the first recipe for doughnuts that I came across that I actually felt I could make at home.  Bonus: Crullers are the healthiest doughnut you can enjoy because they’re so airy which means fewer calories.

As always a few notes before beginning:  you’ll need a pastry bag with a star tip.  I bought a little kit for $5 from Sur la Table-50 disposable pastry bags and 3 plastic tips, including a star tip.  The recipe says to let the doughnuts cool before glazing them.  Truthfully, I think the texture was much better when they were still warm, so I would advise you have the glaze ready to go before you start frying up the doughnuts (just whisk briefly if it starts to harden up).  If your honey has been sitting on the shelf for too long like mine had, 20 seconds or so in the microwave will liquidize it again.  Finally, this recipe is certainly a long process the first time you give it a go, so don’t plan on having these ready before the rest of the household wakes up.  Go into it knowing that and you can have them good to go for a nice brunch.

French Cruller Doughnuts with Maple Vanilla Bean Glaze
Adapted from Doughnuts: Simple and Delicious Recipes to Make at Home via Not So Humble Pie

  • 1 cup water
  • 6 tablespoons butter, cubed
  • 2 teaspoons sugar
  • 1/4 teaspoon salt
  • 1 cup flour, sifted
  • 3 large eggs
  • 2 large egg whites
  • vegetable oil for frying
  • 1 1/2 cups powdered sugar, sifted
  • 1 tablespoon honey
  • 1 teaspoon vanilla bean paste or vanilla extract
  • 3 tablespoons milk
  1. Mix butter, sugar, salt and water in a medium sauce pan and to a rapid boil.
  2. Have a wooden spoon in hand and be ready because this next step goes quickly: add the flour to the pot of boiling mixture, stirring like crazy to make sure the flour is fully incorporated.  It will go from liquid to dough almost instantly.  Keep stirring and mushing it around the bottom of the pot for about 4 to 5 more minutes.  You’re going to get a film coating the bottom of your pot, but it’ll clean up easy later.  Not So Humble Pie pointed out the reasoning is to remove as much moisture as possible so the pastry is lighter than air so cook until there is no steam coming from the pastry any more.
  3. Transfer the pastry to a mixing bowl and beat it with your electric mixer for a minute or so to cool it off, then beat in the eggs one at a time, making sure the egg is completely incorporated before adding the next.
  4. The amount of egg white you add will change with each recipe.  You want to add enough egg white to make the batter glossy (egg white will make the doughnuts light and airy later).  Add too much egg white and the dough will be too soft and the pretty piping won’t hold and your doughnuts will be flat.  Truthfully, I just added both egg whites and didn’t worry about it and my doughnuts ‘wilted’ just a little.
  5. Cut out four 3″ squares of parchment paper (we’ll be reusing them) and lightly grease them.
  6. Heat 2″ of oil to 375 degrees.  Keep your instant thermometer in the oil the whole time so you can keep a close eye on the temperature and keep it as close to 375 as you can.  Also, don’t get impatient and just crank up the heat to get the oil hotter faster-once it reached 375 I turned down the flame, but it kept soaring up past 400 and I just had to wait for it to cool down again.
  7. While the oil is heating, line a table with a stack of paper towels and set out a wire cooling rack.  Also, whip up the glaze by mixing the powdered sugar, vanilla, honey, and adding 3 tablespoons of milk.  If the glaze is not pourable, add one more tablespoon of milk.
  8. Back with the doughnuts, fill a pastry bag fitted with a star tip with the dough and pipe it into a ring shape on each square of greased parchment paper.
  9. Once the oil is hot enough, take one square of paper and gently drop it into the oil, doughnut side down.  The paper will magically unstick and float off the doughnut in just a few seconds; use tongs to pick it up out of the oil and let it drain on the paper towel lined plate.  Fry the dougnut for a few minutes on each side-they should be a deep golden brown color all over.  Transfer completed doughnuts to paper towel lined plate and then over to the cooling rack while you finish the others.
  10. Luckily, you won’t have to grease the squares again, considering they’ve been sitting in a vat of hot oil.  Continue piping rings of doughnut dough onto the squares and frying them until you’re out of dough.
  11. Glaze the doughnuts by flipping them upside down and dipping them in the glaze.  Set them back on the drying rack with some paper towels underneath so that the glaze doesn’t drip all over your table!  Let the glaze dry a little and then enjoy!

Rather Sweet Sangria

Monday, August 15, 2011

For those who missed my post on Blueberry Pie Bars, I’ve joined Project Pastry Queen-a group of wonderful food bloggers who are baking their way through The Pastry Queen by Rebecca Rather.  We’ll post the results of the week’s recipe and this week we were assigned Rebecca’s Rather Sweet Sangria.  “Rather Sweet” is the name of her bakery & cafe in Texas, hence the name of the beverage.  Not your average sorority house sangria, this is a more adult version that leaves out the floating fruit on top (I’m allergic to apples so I can’t drink that kind anyway) and adds brandy for an extra kick.

Of course, I’m not going to make a whole huge batch of sangria and sit at home by myself on a Friday night and drink it on my own-no, that’s where girlfriends come in.  I split the recipe and made one half with the suggested red wine and one with white wine.  Even between 6 of us, we didn’t come close to finishing either batch, so I highly suggest just doing a half recipe unless you have a big party coming up.

That said, we certainly were refreshing glasses the whole evening, so I know the ladies enjoyed it!  It was a touch too sweet for me, but no one else thought so, so keep it in mind when making it to sweeten it to your own taste.

Some notes:  To sample both red and white sangrias, I split the below recipe equally into two bowls and added 1/2 a bottle of red wine to one bowl and 1/2 a bottle of of white wine to the other.  Be sure to start well ahead of time-you have to make the simple syrup first, which is super super easy, but takes 30 minutes plus cooling time.  The original recipe adds pomegranate seeds, which I left out.  Finally, I was apprehensive about having to do this recipe because who has ever seen pomegranate molasses at the store?  I was absolutely shocked to be casually wandering around my local Italian market, waiting for the boyfriend to pay for a sandwich and not actually paying attention to my surroundings, to look down and see a bottle of pomegranate molasses on the shelf (Rebecca’s suggested brand “Indo-European”, no less!).  If it’s that easy for me, it’s got to be easy for you!

Rather Sweet Sangria
From The Pastry Queen

Simple Syrup

  • 2 cups water
  • 1 3/4 cups sugar
  • 1 lime, halved
  • 1 lemon, halved
  1. Simmer the water, sugar, lemon and lime in a saucepan for 30 minutes
  2. After 30 minutes, remove from heat and cool for another 30 minutes
  3. Squeeze the juice from the lemon and lime halves into the syrup and refrigerate until needed

Sangria

  • 1 bottle fruity red Spanish wine or 1 bottle fruity white wine (I used a Sauvignon Blanc)
  • 2 cups brandy
  • 1 tablespoon pomegranate molasses
  • juice from 1 lime
  • 2 bottles (16.9 oz) chilled sparkling water (or 1 bottle, 33 oz)
  • 1 lime sliced
  1. Combine the wine, brandy, pomegranate molasses, lime juice, and sparkling water in a large bowl and mix.  The recipe calls for 2 cups of simple syrup to be added, but as I mentioned, it was awfully sweet for me, so start with 1/2 cup and add more until it is to your liking, up to 2 cups.  Add the lime slices.
  2. If you are not serving immediately, refrigerate the mixture until ready to serve, but hold off on adding the sparkling water, simple syrup and lime slices until the last minute.
  3. Serve over ice and enjoy!  The sangria will keep in the fridge for a week but it will get progressively sweeter the longer it sits.  You will have to thin it down with some more sparkling water (about 1 cup) to dilute the sweetness and add some carbonation back in.

Roasted Red Pepper Dip

Friday, August 12, 2011

I’m having a few friends over tonight to enjoy the beach air and a movie so this is the first of a handful of quick & easy party recipes I have stored up my sleeve for you lovely people.

On any night, my favorite bar food is roasted red pepper dip.  It’s even better as an appetizer at home because when you’re stressing about party planning, this dip takes literally minutes, minimal dishes to clean up later, and then voila!  One less thing on your mind to worry about.

This recipe in particular has just a hint of dairy in it to give it richness and a smooth texture without overdoing it, yet the roasted pepper flavor is still the star.  As you know by now, I am a garlic lover, so you may want to reduce the recipe to just one clove if you’re not so inclined to super garlicky recipes.

Roasted Red Pepper Dip
Adapted from Smitten Kitchen

  • one 15 oz can of white cannelini beans, drained
  • 1 jar roasted red peppers, drained
  • 3 oz cream cheese
  • 2 cloves of garlic
  • 1/4 teaspoon paprika
  • 1/4 teaspoon salt
  • juice from 1/2 of a lemon
  1. Put all ingredients in a food processor or blender.
  2. Blend.
  3. Serve with pita chips or sliced veggies.

Even simpler than whipping this up the day of the party is whipping it up the night before! I promise you can throw this together during a commercial break on tv and go to sleep knowing it’s one less thing you have to accomplish the next day.

Spaghetti with Pecorino Romano and Black Pepper

Wednesday, August 10, 2011

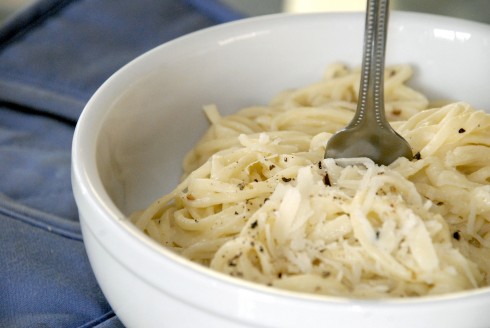
So those who follow this blog on Facebook know that at about 4pm yesterday afternoon I had absolutely no idea what I wanted to make for dinner last night.  So I came home and dug into my magazines and cookbooks and pulled out recipe that fit exactly the criteria I was looking for: few ingredients, little cost, and quick to pull together.  The result was “spaghetti alla cacio e pepe”, or spaghetti with pecorino romano and black pepper-a recipe that always looked so classy that I had just never gotten around to trying.

The trick to this recipe is high quality ingredients so I, of course, making a very traditional Italian meal, decided to go to my local Italian market instead of the giant supermarket.  I’m sure you have one near you as well, you may just have to search online to figure out where it is.  (Not to brag…but my local Italian market, Bay Cities Deli, was featured on Food Network’s “Best Thing I Ever Ate”…but that then means the line is over an hour long for a sandwich on weekends.  It’s worth it.)

Finding the pecorino romano in their cheese section was easy, as I knew it would be, and then I got this crazy idea that an Italian grocery like this would have fresh pasta instead of the typical dried pasta that 99% of us eat.  I’ve certainly never eaten fresh pasta before, so what better time to try it than a time when quality ingredients count?  Bonus: Walked out with a receipt for just $7, despite the fancy stuff I just purchased.

I’ve painted a rosy picture here, but truthfully, I was at the market and panicking because the recipe calls for 3 ounces of cheese and the cheese was only labeled in pounds not ounces, then I realized that the recipe calls for 6 ounces of pasta and, not only is the pasta also labeled in pounds, but fresh pasta certainly weighs more than dried and …wait, how do you cook fresh pasta versus dried pasta?!  Not to mention that once I got home and started cooking, I forgot to save the pasta water as I ALWAYS tend to do so I hope neighbors didn’t hear the screams of rage through my open kitchen window (luckily I realized halfway through pouring out the water so all was not lost).

It turns out, I really just needed to stop panicking because this recipe’s charm is its simplicity and I was totally over-thinking it.  A few final notes: do not eat the cheese off the plate as you’re grating it because you will discover that this is one of the best cheeses you have ever eaten (and I don’t even like hard cheeses like this!) and you will eat the whole wedge before finishing the recipe. Also, do not try eating the fresh spaghetti before you cook it because you will discover that it is so incredibly delicious and you will eat the whole bunch of it before finishing the recipe. Soft and doughy, it has the most amazing flavor and I think I could happily eat it fresh and uncooked for the rest of my life. That all said, if you don’t eat the ingredients beforehand and manage to actually cook dinner, you’ll have a great simple meal on your hands.  If anyone will love this recipe, it’s my sister, who I can remember eating pasta with cheese sprinkled on it for as long as I can remember.

Spaghetti with Pecorino Romano and Black Pepper
Serves 2
Recipe from Cooking for Two 2011

  • 3 oz Pecorino Romano cheese; 1 cup of it finely grated plus about 1/2 cup coarsely grated (my wedge of cheese was about .5 lb)
  • 6 oz spaghetti (easier to figure out: just 2 servings dried or fresh pasta)
  • 1/2 teaspoon salt
  • 1 tablespoon heavy cream
  • 1 teaspoon extra-virgin olive oil
  • 3/4 teaspoon fresh ground black pepper
  1. Right off the bat, DO NOT fill a whole pot of water to boil the pasta (I say it because that’s exactly what I did).  Put only 4 cups (1 quart) of water into a large pot, bring it to a boil.
  2. Add pasta and salt; cook stirring often (it may stick to itself in such low water), for about 5-7 minutes until al dente or your preferred doneness.
  3. Next important tip: DO NOT pour the pasta water into the sink.  The whole reason we boiled the pasta in such a tiny amount of water is to make the water super starchy.  Put a bowl in the sink, put a colander into the bowl, pour the pasta in into the colander.  Shake the pasta a bit to make sure all the water is off and toss it back into the pot, leaving the water in the bowl.
  4. Put the 1 cup of grated pecorino romano into a small mixing bowl.  Pour 1/2 cup of the pasta water over the pecorino romano and whisk slowly until smooth.  Whisk the cream, oil, and black pepper into the melted cheese.
  5. Pour the cheese mixture over the warm pasta in the pot.  Toss the pasta with the sauce and let it sit for 2 minutes to soak up the sauce, tossing the pasta a few times throughout the 2 minutes.  If the sauce is too thick, use the leftover pasta water to thin it down a bit; just stirring it in until you have the desired consistency.
  6. Add an extra twist of the pepper grinder and the coarsely grated cheese-you won’t need even a sprinkle of salt, because the cheese is a great salty cheese, especially if you put a TON of it on top like I did tonight.