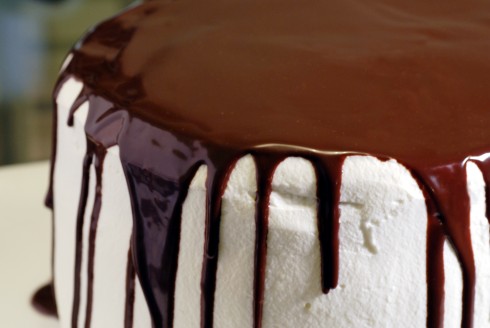
What luck that Shawnda picked such a great cake recipe for the first week of the month for Project Pastry Queen-I’ve started baking treats for the monthly birthday celebration for the office and this was perfect! My only hope is that I get it to the office without issue, which involves driving up and over a mountain range. In fact, as you’re reading this, probably right this moment, my office is either enjoying lovely slices of Tuxedo Cake or eating Cake Mush.
The cake was pretty basic to put together: just a normal chocolate cake, whipped cream, and more or less just melted chocolate. But what a presentation! It just looks so fantastic, with its stark black and white contrast, that I would have sworn it took a lot more manpower and hours than it really did. My only two notes are that I’m always afraid of over-whipping the cream so I started off with whipped cream that was too soft (although it did make a nice “crumb coat”, a thin layer of frosting that seals in all the crumbs so you can add another perfectly crumb-less layer of frosting). The whipped cream is the right consistency when you slap a dollop on the side of the cake and it doesn’t drip right off. Also, Rebecca (and Shawnda) used Lyle’s Golden Syrup. I admit again that I substituted what I already had in my cabinet and readily available. I’m not sure if it was because of this substitution, but my chocolate dripped over the sides perfectly, despite Rebecca’s warning that it might be too thick if you let it cool for too long.
Check out all of the other Project Pastry Queen participants’ takes on the recipe here!
Tuxedo Cake
From Rebecca Rathers’ Pastry Queen
For the cake
- 1 cup (2 sticks) butter
- 2 cups water
- 1 cup canola oil
- 4 cups sugar
- 1 cup unsweetened cocoa powder
- 4 cups all-purpose flour
- 4 large eggs
- 1 cup buttermilk
- 1 Tbsp baking soda
- 1/2 tsp salt
- 1 Tbsp vanilla
For the frosting
- 4 cups chilled heavy whipping cream, well-chilled
- 1 1/4 cup powdered sugar
For the glaze
- 4 oz bittersweet chocolate, chopped fine
- 1/2 cup heavy whipping cream
- 1/4 cup light corn syrup
- 2 tsp vanilla
Cake
- Preheat the oven to 350 degrees. Line the bottom of three 9″ cake pans or two 10″ cake pans with parchment paper rounds and butter and flour the pan or spray with non-stick baking spray.
- Combine the butter, water, and canola oil in a medium saucepan set over medium heat and let butter melt.
- In a large bowl, stir together sugar, cocoa and flour. Pour the butter mixture into the sugar mixture and whisk until smooth.
- Whisk in the eggs, one at a time, then whisk in the buttermilk. Whisk in the baking soda, salt and vanilla all at once.
- Transfer the batter to the prepared pans. For a 3 layer cake, stagger the cake layers on the oven racks so that no layer is directly over another. Set two layers on one rack and the third on the other. Bake 35-40 minutes or until a toothpick inserted in the middle of each layer comes out clean.
- Remove the cakes from the oven and cool on racks for about 15 minutes before inverting onto baking racks. Cool the cakes completely, at least 2 hours, before frosting.
Frosting
- Whip the cream in a large bowl on high speed until soft peaks form (when you lift the beaters out and turn them upside down, there should be little peaks on the end of the beaters whose tips fall over quickly).
- Add the powdered sugar and whip until stiff peaks form (the peaks will stand tall and not fall over).
- Place first layer of cake onto serving plate and top with a layer of frosting. Add second layer of cake and frosting and last layer of cake and frosting before frosting the sides of the cake with a thick layer of whipped cream.
- Put cake in fridge and let frosting set for 1 hour.
Glaze
- Place the chopped chocolate in a small bowl. Heat the cream in a small saucepan until steaming and pour it over the chocolate. Whisk until chocolate is fully melted.
- Stir in the corn syrup and vanilla until fully incorporated and set bowl aside to cool for 10 minutes.
- Drizzle the glaze along the top edge of the cake and cover the whole top of the cake with glaze.
- Many people finish with strawberries, often covered in chocolate, but strawberry season is just closing here so I decided to forgo them this time-but the next time I make this I will definitely be including them!


3 comments :
Looks beautiful! And even if it ends up as Cake Mush, it will still taste great
Cake managed to stay intact but I had a few people unhappy that I made left hand turns and crawled up parking lot driveways at a snail’s pace so as not to fling the cake across the car
Wow. Emily made this cake and brought it to the office for my birthday (well, actually, it was for this food blog, but I like to think it’s all for me). Anyway, this was by far, the BEST cake I’ve ever had in my life!!! I would recommend this to anyone!!!