Entries Tagged as 'Brunch'

Quiche Lorraine

Tuesday, January 8, 2013

quiche lorraine


The name “Vegas” means different things to different people.  To some it means losing a lot of money, to others it means consuming lots of alcohol and dancing in a dark nightclub.  To me, though, it means eating.  Even when I’m on a budget, I never want for interesting new places to experience a meal.  With all the fancy restaurants you can drop your dollars at along the strip, my favorite came as quite a surprise…

In the shadow of the Eiffel Tower at the Paris Hotel, you’ll see a cafe, Mon Ami Gabi.  If you’re like me, you’ll assume that it’s a tourist trap, because it’s under a fake Eiffel Tower and it has a great view of the Bellagio water fountains across the street.  You’ll assume that it’s sickeningly overpriced and sub-par quality.  Hopefully you’ll be dragged in there one time, though, and you’ll realize that all of your assumptions were 100% incorrect.  There, under that Eiffel Tower, I was served the best quiche I have ever had in my entire life and it didn’t cost an arm and a leg.  Well, my aunt got the quiche, I got the eggs Benedict, but I wished desperately I had gotten the quiche.  It’s creamy and custard-like, instead of stiff and eggy, and it’s chock full of cheese, bacon and sweet caramelized almost jam-like onions.  I thought I was going to have to beg the waiter to beg the chef for me for the unbelievable quiche’s recipe, but imagine my second surprise of the morning when the waiter brought me a special little card to fill out, to request that the chef send me the recipe.  Clearly, they get asked a lot.  Also, once I received the recipe, I realized why it was so tasty:  there was more heavy cream in it than eggs.  Did I care?  No.  Still easily the best quiche of my life and I have no regrets.

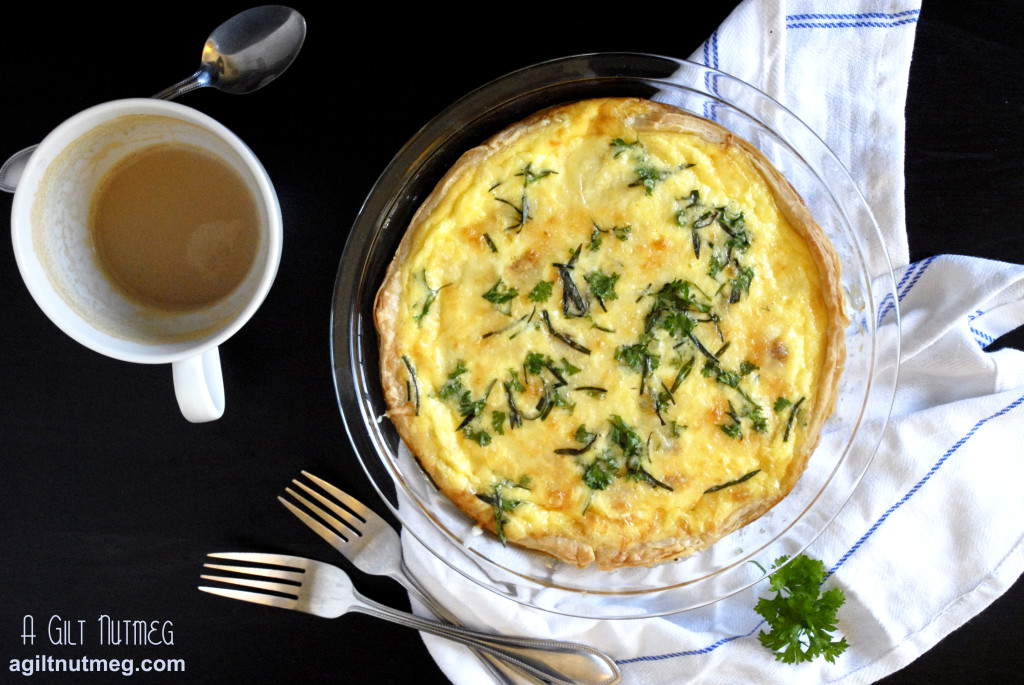
Because this isn’t one of those giant deep-dish quiches, don’t expect to make this recipe to feed a large crowd.  It should serve about 4 if you pair it with a light side salad like they do at Mon Ami Gabi or another side dish.  Or one home cook-blogger and her boyfriend, because it’s not like they didn’t eat enough rich food over the holidays as it was.  Also, make sure to use a shallow, wide bottomed pie dish- the wider the bottom, the more room for that bacon and cheese and onion!

Quiche Lorraine
Adapted from Mon Ami Gabi, Las Vegas
Serves 4

  • 1 sheet of puff pastry dough, thawed
  • 1 small yellow onion, diced
  • 2 pieces bacon, cooked & crumbled
  • about 1/4 cup Jarlsberg cheese, shredded (can substitute Swiss or Gruyere)
  • 3 eggs
  • 1 1/3 cups heavy cream
  • small handful of chopped fresh herbs — chives, parsley and tarragon are a great combination
  • salt & pepper
  1. If you want to save time the morning you make the quiche, cook the bacon and caramelize the onions ahead of time and refrigerate until ready to use.  I’m sure you know how to fry up a couple of slices of bacon, but if you’ve never caramelized onion before, it’s quite easy.  I leave a little bit of the bacon drippings in the pan, add the diced onion, sprinkle with a tablespoon of sugar and cook on low heat, stirring frequently, very slowly and very gently browning the onion.  The process can take quite a while, but the more you go through the steps and know what to look for, the faster you can go in the future.  The onions will be a very deep brown and, if you put them in the fridge overnight, they’ll turn into a jam like texture.
  2. Heat the oven to 350 degrees.
  3. In the meantime, lightly roll out the puff pastry if it needs it, to better fit the pie plate.  Mine was a square sheet, so I arranged it in the plate, then trimmed the corners off with a knife so that the dough was an even circle all around.  It’s okay if it doesn’t reach the top of the plate like a normal pie crust.
  4. Blind bake the puff pastry — spray a piece of tin foil with non-stick baking spray and place it on top of the puff pastry, with the spray side facing down.  Fill the covered pastry with some sort of weight: rice, dried beans, or specifically designated pie weights.  Bake for 12-15 minutes until fully baked but not particularly browned all the way.
  5. Once the puff pastry is baked, pull it out of the oven (leave the oven on).  Sprinkle the pastry crust with an even layer of the caramelized onion, then the crumbled bacon, then the shredded cheese.
  6. Whisk together the eggs, cream, herbs and salt & pepper (to taste) in a small bowl.  Pour the mixture over the crust and fillings until the fillings are just barely covered.  You may not use all of the egg-cream mixture, just set the extra aside.
  7. Carefully move the quiche to the oven and bake for 35-40 minutes, until the filling is dry on top and starting to lightly brown in spots.
  8. Serve warm with a light side salad and enjoy a taste of France!…or Vegas, rather.

Maple-Cider Glazed Bacon

Wednesday, August 22, 2012

maple cider glazed bacon

So when I said “I have bacon for you this Friday” I bet you didn’t think I meant “1 1/2 weeks later on a Wednesday”, did you?  Stuff got in the way, but here’s the bacon!  It’s outrageously good, so you should probably just quit whatever you’re doing and head to your oven right now.  Seriously, look at the picture below:

Could there be bacon any more glossy and translucent?  Look at that glaze!  It’s practically shellacked on.  Best of all, this bacon is baked in the oven so you don’t have to think twice about it while you’re still cooking eggs or something.  While not as covered in spices and herbs as other glazed bacon I’ve come across here in LA’s trendy restaurants, this bacon has a sweet/savory finish that is still going to leave you fighting over that last piece.  And, of course, if you want to experiment with all those herbs and spices, go for it!  I bet thyme or some Cajun seasoning would be great!

Maple-Cider Glazed Bacon
Makes 1 package of bacon
Was initially my own creation, but then I found The Spontaneous Hausfrau
already thought of it, so I have to give her credit for helping with ratios

  • 1 cup apple cider
  • 2 Tablespoons maple syrup (try to find the real thing here, not the corn syrup version)
  • 1 package of your favorite bacon
  • salt & pepper
  1. Heat the oven to 450 degrees.
  2. In a small saucepan, boil the apple cider and maple syrup until reduced to about half.  Let it cool slightly as you’re laying out the bacon.
  3. Cover a rimmed baking sheet in tin foil and arrange your bacon in rows on the sheet.  You don’t want them overlapping, but if you want to fit a whole package, you’ll likely have to pack those babies in pretty tightly next to each other.  Personally, I know the bacon is going to be sizzling in its own grease in the oven and I love that thought, but if that’s not your thing, you can arrange the bacon on wire cooling racks on your baking sheet so that the grease drips off as it bakes.  Just know that some of your glaze will drip off too!
  4. Using a basting brush, generously brush about half the glaze over the top of the bacon, then grind salt and pepper over the top of the bacon.
  5. Bake for about 10 minutes until the bacon is sizzling and darkening in color.  Flip the bacon slices and baste with the remaining cider.
  6. Continue baking for another 5-10 minutes until the slices are darkened and crispy on the edges.
  7. Let the baking sheet cool for about 10 minutes on a wire cooling rack.  If you want to mop up some of the grease in the pan with paper towels, go for it.
  8. Once the bacon is a little cool and the glaze has had a chance to cool and stick to the bacon, line a plate with a stack of paper towels and move the bacon slices out of the baking pan and onto the paper towels.  Gently blot the slices (if you press too hard the paper towel may stick to the glaze) and then move to a warm plate for serving.  Enjoy!

Bell Pepper-Sausage Kolache & Apricot-Nectarine Kolache

Monday, August 20, 2012

kolache

Being a part of a family that very proudly celebrates our Slovak heritage, I was fascinated to hear about Texas’ love affair with kolache, a Czech pastry.  Even better, kolache is a strongly featured recipe in The Pastry Queen—I’m so glad that I was able to circle back around and make it before Project Pastry Queen was officially over.  My biggest problem, it turns out, was just figuring out how to say the darn thing!  The world wide webiverse told me it was “ko-losh” or “ko-losh-ee”.  Enlisting the help of a Czech coworker, she said it was “ko-lotch-ee”.  I guess, in the end, it doesn’t matter, because—even though I’m still uneasy with all bread-making activities—these were mostly successful.  I’ve never eaten one made by someone else, so I don’t have anything to compare them to, but I can say that the dough is sweet and tastes very close to my favorite Cantonese Dim Sum BBQ Pork Filled Buns, albeit a little bit denser.  I know it’s a strange comparison, but in the end, it’s a small world, after all.

bell pepper sausage kolache

I split the recipe into half and made one half open-faced with nectarines, apricot jam, and brown sugar streusel.  The other half had the dough wrapped around a red bell pepper and sausage filling so that the filling was hidden inside.  I will say that I definitely have to work on my technique—as we all know here, bread dough and I don’t get along, so the nectarine kolache weren’t so much perfect little deep wells of fruit, but instead the fruit kind of hovered on top.  I also would add more of the savory filling next time because you can, obviously, never have enough sausage.  Overall, though, they were great!  The dough didn’t require any kneading, so, even though mine weren’t perfectly beautiful, I still recommend this recipe to anyone wanting to try yeast breads.  You literally just mix the dough, then stick in the fridge till morning and voila!

apricot nectarine kolache

Kolache
Makes 16-18 kolache
Dough adaptation directly from The Foodie Bride

Fillings inspired by The Pastry Queen

Dough (for a full recipe - 16-18 kolache)

  • 1 package (2 1/4 tsp) active dry yeast
  • 1/4 cup water, warmed to 110-115F
  • 1 cup milk, warmed to 110-115F
  • 4 Tbsp butter, melted and cooled to warm
  • 2 large eggs
  • 5/8 cup sugar + 1 teaspoon sugar
  • 1 tsp salt
  • 4 1/4 cups flour

Red Bell Pepper & Sausage Filling (for a half recipe - 8-9 kolache)

  • 1 cup cooked sausage, chopped (I used a chicken sausage)
  • 1 cup red bell pepper, chopped

Nectarine-Apricot Filling & Streusel (for a half recipe - 8-9 kolache)

  • 1 large nectarine, chopped
  • 1/4 cup apricot jam/jelly, melted
  • 2 tablespoons flour
  • 2 tablespoons brown sugar
  • 2 tablespoons chilled butter
  1. Add your warm water to your mixing bowl (or bowl of stand mixer) and stir in 1 teaspoon sugar..  Sprinkle yeast over the sugar water mixture and let stand 5 minutes until foamy.
  2. Add milk, butter, eggs, sugar and salt to bowl and mix on low until ingredients are thoroughly incorporated.
  3. Also on low, mix in half of the flour, wait until its incorporated, then mix in the second half of the flour, mixing just until incorporated.  My dough was pretty lumpy looking and, truthfully, I’m not sure if that’s how it’s supposed to look or not.
  4. Let the dough rest 1-2 hours, until doubled in size.  Punch the dough down (deflate it) and then cover it with plastic wrap and stick it in the fridge overnight.  If you’re in a rush, 4 hours is enough, but who doesn’t want the ease of just throwing something in the fridge and not worrying about it until morning?
  5. When ready to start, heat the oven to 375, line a baking sheet with parchment paper (or use non-stick spray) and divide the dough into balls.  They’ll be a bigger than golf balls, about 2 1/2″ wide.  Shawnda helpfully points out that the balls should weigh about 2.5 oz each.
  6. Let the dough rest for 15 minutes while you prepare the filling ingredients- make sure the bell pepper and sausage is chopped; combine the warmed apricot jam in a bowl with the chopped nectarine and stir to coat the nectarine.  You could easily make the streusel topping in a food processor, but it’s such a small amount that I just tossed the flour, brown sugar and butter into a mixing bowl and mushed it around with a fork and a butter knife until it was well combined and crumbly.
  7. If making sausage kolache, flatten out the balls of dough, press about a tablespoon of filling into each round of dough and then wrap the dough over the filling, pinching it shut.  Arrange the balls of dough with the seam side down on the baking sheet and arrange so that the balls are just an inch or so apart.
  8. If making open faced nectarine kolache, slightly flatten the balls and then poke a little well into the dough.  Fill the well with a tablespoon or so of fruit filling, then sprinkle the streusel topping over each one.  Arrange on the baking sheet so that the edges are just touching.
  9. Let the prepared kolache rest for 20 minutes or so and then bake for 20-25 minutes until golden brown on top.  I brushed some melted butter over the tops of the kolache warm from the oven, but that’s up to you.
  10. Serve warm and enjoy!

White Cheddar Poblano Grits

Wednesday, August 8, 2012

white cheddar poblano grits

My dear readers.  I am about to share with you one of my favorite recipes of all time.  I don’t know if words can even describe my love for this recipe, but I’ll try…  I first discovered it a few summers ago when a group of friends and I went to the Ace Hotel in Palm Springs for a bachelorette weekend away.  If you’ve never been to Palm Springs, imagine being put into a blazing hot oven, but there’s a pool.  I think it was 114 degrees when we were there and barely a drop of shade.  The heat just emanates off of every surface.  This may not sound like a very good weekend to you, but with nothing else to do but lounge in the pool, it somehow all equals up to be one of the most relaxing weekends you can have.  On our last morning there, we got breakfast by the pool and their “Poblano Cheddar Grits” caught my eye.  I knew I was in trouble after my first bite-I so carefully savored every tiny morsel that all of my friends actually left me at the table to go pack instead of watch me lick the bowl of this rich, flavorful, new favorite breakfast.

Back home, weeks later, I was still dreaming about the grits.  A trip back to the Ace was not in the question, so I went about trying to recreate them.  Searching for a recipe for White Cheddar Grits on Google actually brought up a recipe from a great restaurant in Atlanta, The Flying Biscuit.  Their Creamy Dreamy White Cheddar Grits are pretty famous and I was delighted to have a recipe from such a familiar place close to home to start as the basis of my recipe-they’re heavily decadent and snow white unlike any other grits recipes I’ve seen.  I quickly researched roasting techniques for some Poblano Peppers and voila!  Bacon is a requirement to crumble over the top (I’ve got some amazing Apple Cider-Maple Glazed Bacon for you on Friday) and I really can’t imagine a better breakfast.  Thanks to the Ace Hotel for introducing me to one of the recipe loves-of-my-life.


White Cheddar Poblano Grits
Adapted from The Flying Biscuit Cafe and Inspired by The Ace Hotel, Palm Springs
Serves 2-3 as a main dish, more if a side

  • 2 poblano chile peppers
  • 3 cups water
  • 1 cup half-and-half
  • 1.5 teaspoons kosher salt
  • heaping 1/4 teaspoon white pepper
  • 1 cup quick grits
  • 1/2 - 1 cup grated white cheddar cheese (to taste-1 cup is very cheesy) (I prefer mild white cheddar cheese over sharp)
  • 4 tablespoons unsalted butter, cubed
  1.  Roasting poblanos can happen one of two ways:  first, rub with olive oil, then grip them tightly in a pair of tongs and hold over your gas burner’s flame, turning until all sides are blackened and bubbly.  Only attempt this if you have metal tongs (my plastic coated ones may or may not be slightly melted now).  The other method involves rubbing them with olive oil, then placing in your oven set to broil, turning every few minutes until all sides are blackened and bubbly.  Either way, once blackened, put the peppers into a paper bag while you make the grits-they’ll sweat in there and the skin will be super easy to remove later.  Also good to note: the oven method will result in softer peppers in your grits, the gas burner method will result in slightly more crunchy peppers.
  2. In a medium-large saucepan, bring the water, half and half, and salt to a boil.
  3. Slowly pour the grits in, whisking the entire time.  Lower heat and let thicken 7-10 minutes, whisking frequently.
  4. While the grits are cooking, take the peppers and remove the outer burned skin so all you have left is the soft pepper flesh underneath.  Remove the seeds and ribs and slice into strips and then 1″ pieces.  If you prefer, you could roughly chop for smaller pieces.
  5. Stir the cheese into the grits until melted, then stir in the butter until also melted and smooth.
  6. Add the poblano pieces and stir gently in.  Taste to see if you want more salt or a little more white pepper.
  7. Serve with some delicious crispy bacon to crumble on top and enjoy!

Strawberries with Honey-Vanilla Creme Anglaise

Monday, July 23, 2012

strawberries with honey vanilla creme anglais

Last summer I posted a recipe for Roasted Peaches with Oatmeal Streusel and Vanilla Bean Creme Anglaise.  While the picture definitely leaves something to be desired (it’s MUCH more tasty than it looks in that photo), that creme Anglaise pretty much changed my life.  I never knew such vanilla-packed creaminess could come out of my kitchen.  Now that summer fruits and berries are back with a vengeance, I knew the creme would be making an appearance again, but I wasn’t sure when until I saw Not Without Salt’s honey variation a few weeks ago.  She posted the recipe on July 3 and by the next morning I was serving it for 4th of July brunch.

strawberries with honey vanilla creme anglais - overhead

While I loved the intense vanilla flavor of the first creme Anglaise I made, this version has overtones of honey that lend a very interesting depth to the creme.  It elevated what were already perfect summer strawberries to a whole new level.  Best of all, you can absolutely make this easy sauce ahead of time and all you have to do later to serve it is slice up some strawberries.

Honey-Vanilla Creme Anglaise
Adapted from Not Without Salt

  • 1 ½ cups heavy cream
  • ½ cup whole milk
  • 1 1/2 Tablespoons vanilla bean paste or extract
  • pinch of salt
  • ¼ cup honey
  • 4 egg yolks
  1. In a medium saucepan, stir together the cream, milk and vanilla.  Bring the mixture to a simmer and then let rest for 15 minutes.
  2. In a separate medium sized bowl, whisk together the salt, honey and egg yolks until thoroughly combined.
  3. Bring the cream-milk mixture back to a simmer.
  4. Slowly drizzle the warmed milk mixture into the honey-yolk mixture, whisking constantly as you go.
  5. Pour the contents of the bowl back into the saucepan and heat slowly to 175 degrees.  You’ll know it’s ready when the mixture coats the back of your wooden spoon.
  6. Using a fine mesh strainer over a clean medium mixing bowl, strain the mixture.
  7. Gently press a piece of plastic wrap over the surface of the creme Anglaise and refrigerate it for at least half an hour.  It will thicken and cool while in there.  (Not Without Salt suggests you can eat it warm, but my favorite is cold)
  8. When ready to serve over fruit, pour a little into the serving bowl first, then add the berries, then top with more creme.  Enjoy for brunch, dessert, whenever!

Pineapple Coconut Cobbler

Friday, July 20, 2012

coconut pineapple cobbler

When I think of cobbler, I always think of berries, or maybe peaches.  Pineapple had never EVER crossed my mind to put in cobbler and, I confess, now that I’ve made it, I can’t stop thinking about it.  The same thing happened when I moved to California, where fresh pineapple is much more abundant-I never went back to canned pineapple again.  This cobbler is a delicious tropical version of a very traditional dessert and one you should give a try as soon as you can!

When I found this recipe, it was good the first time, but I felt like it could use some spicing up, so I tweaked it to include flavors that would compliment the tropical fruit featured-ginger, vanilla, rum.  I think it’s perfection, as long as you have a scoop of vanilla ice cream to compliment it on your plate.

Pineapple Coconut Cobbler
Adapted from Patrick Callarec, executive chef, Aulani

  • 1 medium pineapple, peeled, cored and diced
  • 1/3 cup brown sugar
  • 1 cup shredded coconut (if you want a less sweet cobbler, track down some unsweetened coconut)
  • 1/2 cup all-purpose flour
  • 1/2 cup sugar
  • 1/2 cup milk
  • 1/4 cup butter, melted
  • 1/4 teaspoon baking powder
  • Pinch of salt
  • 1/4 teaspoon cinnamon
  • 1/8 teaspoon ginger
  • 3/4 teaspoon vanilla
  • 1 Tablespoon rum
  1. Heat oven to 350 degrees.  Spray a baking dish with baking spray-you can use an 8 x 6″ square pan as the original recipe suggested, but I used a 2 quart oval baking dish.
  2. In a large saute pan, stir the pineapple and brown sugar together until melted and bubbling.  Let the mixture simmer and bubble for 10 minutes, stirring occasionally stirring.
  3. After sauteing, pour the mixture into a small bowl and add the coconut.  Mix together until the coconut is evenly coated in the melted brown sugar-pineapple mixture (or until the pineapple is evenly coated in coconut, depending on which way you look at it) and set aside.
  4. In a medium bowl, whisk together the remaining ingredients-flour, sugar, milk, butter, baking powder, spices and rum.
  5. Pour the batter into the prepared baking dish and evenly distribute the pineapple-coconut mixture over the top of the batter.
  6. Bake for 40-45 minutes until the edges are golden brown.
  7. Serve warm with vanilla ice cream and enjoy!

Bacon and Cheddar Scones

Wednesday, July 18, 2012

bacon cheddar scones

I’m so glad I went back and made sure to try this recipe for Project Pastry Queen, because these are really fantastic scones!  I’d never made a savory scone before, so I was curious about how these would turn out.  In the end, they’re a meal in themselves-hearty, filling, and satisfying.  There’s sharp cheddar cheese, smoky bacon, fresh green onions, and piquant black pepper.  All that’s missing for breakfast are the eggs, but those aren’t hard to scramble up.  Everyone who ate these gave them rave reviews, so I’m definitely adding them to my regular breakfast/brunch menu for when something a little special is in order!

Be sure to check out Emily’s Ruf Love blog, who chose this recipe, as well as the rest of the PPQer’s take on the recipe.

Bacon and Cheddar Scones
Adapted from The Pastry Queen by Rebecca Rather

  •  3 cups flour
  • 1 tablespoon baking powder
  • 1 teaspoon salt
  • 2 teaspoons freshly ground black pepper
  • 1/2 cup chilled butter, cut into cubes
  • 1 1/2 cups grated Cheddar cheese
  • 4 green onions, thinly sliced
  • 10 slices of bacon, cooked and chopped into 1″ pieces
  • 3/4 to 1 1/2 cups buttermilk
  • 1 egg
  • 2 tablespoons water
  1. Heat the oven to 400 degrees.  Cook the bacon and chop it, if you haven’t already done so.
  2. In a large bowl on low speed, combine the flour, baking powder, salt and pepper.
  3. With the mixer still on low speed, add the cubes of butter one at a time, until the mixture is crumbly.  You want pieces no bigger than peas.
  4. Add the cheese to the bowl and turn off the mixer as soon as the cheese is incorporated into the mixture.
  5. Put the electric mixer away and, with a wooden spoon or sturdy spatula, mix in the green onions, bacon, and 3/4 cup of the buttermilk until combined.  You want to do as little stirring as possible or else your scones will be tougher than a boot.  If there are still crumbles that sit in the bottom of the bowl, add a teensy bit of buttermilk at a time until the dough sticks all together and can be squished into a ball.
  6. Lightly flour a cutting board and turn the dough ball out onto the board.  Pat the dough into a round shape and, with a floured rolling pin, roll the dough out until it’s a circle 8″ wide.
  7. Using a large knife, cut the round into 8 wedges.
  8. In a small bowl, whisk together the egg and water and brush the mixture over the tops of the scones.
  9. Move the scones to an ungreased baking sheet and bake for approximately 18 minutes until golden brown on top.
  10. Definitely warm them up again in a 350 degree oven for 10-15 minutes if you’re going to serve them later.  Enjoy with a tall glass of milk!

Coffee Cake

Wednesday, June 27, 2012

coffee cake

This recipe is not lying when it uses the term “cake”.  Cooks Illustrated modified their yellow cake recipe into New York Style Coffee Cake; it literally is cake for breakfast, so tread carefully.  That said, this cake is delicate and light as a feather and I was quite impressed with its soft texture.  I was short on a few ingredients so I had to make some changes (adding lemon juice to milk to sub in for buttermilk), while at the same time I was rushing around the kitchen, trying to get back into the groove of baking and therefore did not read the instructions carefully enough.  I mixed the crumb topping ingredients in the wrong order, resulting in a very different texture than what Cooks was calling for.  I also didn’t have enough cake flour, so I made sure to use the cake flour I had left for the cake itself (since the light-fluffy texture the cake flour would contribute to was so important there) and sub in some all-purpose flour for the topping.  Between the mixing incorrectly and the AP flour, I think the topping didn’t turn out for the best (it was super super crunchy), but any shortcomings here were my own fault, not the recipe, and I’m looking forward to trying it again.  I’ve included the recipe as it reads from Cooks below, so you don’t have to make the same mistakes I did.  (Or, if you do want that crunchy topping, use AP flour—for the topping only—and mix all the dry topping ingredients together before adding the butter instead of waiting to add the flour last after the butter.)


New York Style Crumb Cake
Cooks Illustrated, May 2007

Crumb Topping

  • 1/3 cup sugar
  • 1/3 cup dark brown sugar
  • ¾ teaspoon ground cinnamon
  • 1/8 teaspoon table salt
  • 8 tablespoons unsalted butter (1 stick), melted and still warm
  • 1 ¾ cups cake flour

Cake

  • 1 ¼ cups cake flour
  • ½ cup sugar
  • ¼ teaspoon baking soda
  • ¼ teaspoon table salt
  • 6 tablespoons unsalted butter (3/4 stick), cut into 6 pieces, softened but still cool
  • 1 large egg
  • 1 large egg yolk
  • 1 teaspoon vanilla extract
  • 1/3 cup buttermilk
  • Confectioners’ sugar for dusting
  1. Pull out a piece of aluminum foil about 16” long and fold it in half, lengthwise, so you have a long skinny strip.  Place it in the bottom of an 8×8” baking pan; this will act as a sling to help you pull the cake out after baking.  Spray the pan and foil with non-stick baking spray and set aside.
  2. In a medium bowl, mix the sugar, brown sugar, cinnamon and salt until combined.
  3. Using a wooden spoon or spatula, stir the butter in until combined, then stir the flour in, forming a dough.  Set aside.
  4. In a large bowl or a standing mixer bowl, mix together on low speed the flour, sugar, baking soda and salt.
  5. Still on low speed, drop in the pieces of butter, one at a time, until there are no large pieces of butter left and the mixture looks like crumbles, 2 minutes or so.  I stepped away for just a moment when this was going on and I came back not a few seconds later and it had already passed the crumble stage and amassed into one large piece of dough, so it will happen quickly.
  6. Add the egg, egg yolk, vanilla and buttermilk to the butter-sugar mixture and beat on medium high speed for at least one minute until the batter turns light yellow and uniform.
  7. Pour the batter into the prepared pan and smooth out the top with a spatula.
  8. Using your fingers, break up the crumble topping into pea sized pieces and sprinkle over the top of the cake.  I remember from Home Ec class back in 6th grade, that when making crumb cake you should always start your crumbles in the corners and then work towards the middle (and Cooks backs this up, too).
  9. Bake for 35-45 minutes until a tester comes out clean and the topping is golden brown.
  10. Let cool on a wire rack for half an hour before digging in with a glass of milk or a cup of coffee.  Enjoy!

Pineapple Jam

Friday, June 8, 2012

Two Decembers ago, The Boyfriend came home to Georgia with me for his first Southern Christmas and, in a very thoughtful gesture, my Dad made a Pineapple Pie our first night home—fitting, considering pineapples are the universal sign for “welcome”.  I remember Dad remarking on how much he loved pineapple pie and it stuck with me, mostly because I don’t remember us ever really making it before that Christmas.

Usually resigned to seeing my family only once a year, I have the rare pleasure of seeing my family this weekend—and it’s not even a holiday!  Since Father’s Day is only a week away, I decided to take the opportunity to make Dad a little gift.  Remembering the Pineapple Pie, I was pleased as punch when I came up with an idea to make Pineapple Jam, a fitting summer twist on the pie.  I haven’t told him yet, so no one ruin the surprise until tonight, okay?

For those of you nervous about jam-making, this makes a very small batch and one that is relatively quick as well.  It’s a great starter into the world of jam and canning!  That said, I do wonder if what I made is more like Pineapple jelly rather than jam, but either way it’s a delightfully sweet and acidic flavor that you wouldn’t normally find at the grocery store.  Even better, if you’re not a breakfast person, you can use it as a glaze for ham or chicken instead.

Finally, you’ll notice in the photo that one jar is darker than the other.  I made one jar of plain Pineapple Jam (to showcase the clean sweetness I love about pineapple) and, to make things interesting, I stirred a little bit of vanilla bean paste and some powdered ginger into the other jar while the jam was still hot.  Since the jars have been through the canning process so they were airtight for my parents to be able to travel back home with, I admit I haven’t been able to taste it, but I promise I will report back here with Dad’s thoughts—fingers crossed he loves it.  I’ve listed the ingredients for the variation at the bottom if you don’t want to wait for our word on it.

Update: Dad loved both jams!  He said that initially his favorite was the plain jam and finished that jar first, but he let me know later that after the Ginger-Vanilla flavor had a chance to mellow and meld in the fridge, that it turned out to be his favorite after all.  So just know, you’ll want this flavored jam to “age”  a little bit, but you’ll be rewarded with a wonderful depth of flavor.

Note:  For canning, you’ll need two ½ pint jars, plus an extra little Tupperware or jar for whatever doesn’t fit into the first two jars—you’ll throw this extra in the fridge to eat in the next week or so without having to worry about the canning process since there will be too much air in that last jar to go through canning.

Pineapple Jam
Adapted From Coleen’s Recipes
Makes 2-3 cups

  • One can (20 oz) crushed pineapple
  • 1 ¼ cups pineapple juice
  • 1 ¾ oz fruit pectin powder
  • 3 cups sugar
  1. Start a large pot of water boiling and in the meantime, wash your jars and lids with hot soapy water.  Set the jars and lids into the pot of water and let them boil for ten minutes (about the time it takes to measure out the ingredients and make the jam).  Doing this keeps the jars hot so that they don’t crack and break, which would happen if you put hot jam into cold jars.
  2. In a large saucepan, combine the pineapple, juice and pectin and stir continuously until boiling.  Make sure the pectin is completely dissolved and no blobs of powder remain.  If you want a smoother jam, you can use a stick blender to blend the pineapple a little bit (later I wondered if this is why mine came out more jelly like in texture.  I won’t blend it next time).
  3. After it’s boiling, add the sugar, stirring until dissolved, and bring it back to a rolling boil.  Coleen says to bring it “a boil you can’t stir down”, which was an excellent way to put it, and let it boil for 1 minute.
  4. Spread a clean towel on your kitchen counter and (I just use normal kitchen tongs) carefully pull the jars and lids out of the hot water and wipe them down with another clean towel (be careful, they’re hot!).  Keep the pot boiling in the meantime.
  5. Skim the foam off the top of the boiling jam and discard.
  6. Ladle the jam into the waiting jars, filling the jars to within ¼” of the top rim.  Wipe off any jam that you dripped on them, and quickly screw the lids on (they don’t need to be super tight, just tight enough that you’ll be able to unscrew them without issue later).
  7. Carefully lower the lidded jars into the boiling water and let them boil for 10 minutes.  Putting a towel in the bottom of the pot will reduce some of the racket of the jars rattling around.
  8. After ten minutes is up, take the jars out and set them on another clean towel on your counter.  Press the lids—they should be tight and not pop up and down.  If they pop up and down when you press, put them back in the water for another 5 minutes.  I will admit that the last time I made a large batch, some of the lids popped up and down slightly and I was just too tired at that point to put them back in the water, so I left them on the counter and when I came back in the morning, tada!  They were tight in the morning and didn’t pop.  But then, I’ve always been a little lax when it comes to rules like that and I’ve never gotten food poisoning, so I’ll leave that call up to you.
  9. The jars that have been through the canning process can be left out until ready to give as gifts or to use yourself, but once you open them, put them in the fridge.  The leftovers that didn’t fill up a whole jar should go straight into the fridge.  Enjoy on toast or as a glaze to spice up whatever meat you’re cooking that night!


Variation: Ginger-Vanilla Bean Pineapple Jam

If you want your whole batch to be flavored, stir in a ½ teaspoon of ground ginger and 2/3 teaspoon of vanilla bean paste (or seeds of ½ a scraped vanilla bean, plus a splash of extract).  If you want one jar flavored and one plain, ladle the jam into the jars and then stir ¼ teaspoon of ground ginger and 1/3 teaspoon of vanilla bean paste directly into one of the jars before canning.

French Yogurt Cake

Friday, May 4, 2012

french yogurt cake

Lots of people tell me that baking is hard for them, but I’m always right there assuring them it’s not as hard as it seems.  With baking being so daunting, many people are only willing to attempt the back of a cake mix box; “Add”, “Stir”, “Bake”.  This recipe has just a few extra steps beyond that and it looks beautiful, but guess what?  It’s the first recipe a child in France is given to try.  If they can do it, you certainly can too, right?

The cake itself is very close to a pound cake-a close cousin, if you will-yet with a distinctly lighter texture and a very bright tangy lemon and yogurt flavor.  It’s perfect for spring and the various brunches that are always popping up around this time.  Make it for friends, or, if yours is a family that enjoys baking regularly, give it to your child to try making on their own.  It’s the French way, after all!

**Edit: I made this cake Thursday night and just got home today, Friday, from work to find nothing but CRUMBS.  Between me, The Roommate and The Boyfriend, this cake was clearly a huge winner-lasting less than 24 hours has to be a sign!

French Yogurt Cake
Adapted from Bon Appetit, May 2012

  • 1 1/2 cups flour
  • 2 teaspoons baking powder
  • 3/4 teaspoon kosher salt
  • 1 cup sugar
  • Zest of 1 lemon
  • 3/4 cup whole-milk Greek yogurt
  • 1/2 cup vegetable oil
  • 2 large eggs
  • 1/2 teaspoon vanilla extract
  1. Heat oven to 350 degrees and grease the inside of a loaf pan (I used a 8 1/2 x 4 1/4-inch sized pan) with baking spray.
  2. In a medium bowl, combine the flour, baking powder and salt.
  3. In large bowl, add the sugar and lemon zest, then with your fingers, pinch and mash the sugar.  You’re getting all that good lemon flavor incorporated into the sugar, so work with it for at least a minute, probably two minutes.  You’ll know it’s done when the sugar starts to look crumbly.
  4. Add the yogurt, oil, eggs and vanilla to the sugar lemon mixture and stir until smooth.
  5. Add the flour mixture to the wet ingredients and fold them in.  You don’t want to just stir them in, but do keep folding until the batter is mostly smooth.
  6. Pour the batter into the prepared pan, smooth out the batter on top, and bake for 45-50 minutes, until golden brown on top and hollow sounding when you tap it on top.
  7. Let cool in the pan for 15 minutes, then invert it onto a wire rack to finish cooling before eating.  Enjoy!