Entries Tagged as 'Munchies'

Toast Two Ways

Friday, January 18, 2013

Toast Two Ways from A Gilt Nutmeg

On my way home from my favorite yoga studio, I walk by this phenomenal diner called Swingers.  Specializing in classic American diner food but with twists to make it organic/vegetarian/vegan, they have this amazing avocado toast, and after a hard work out class, absolutely nothing sounds better to my rumbling stomach: rich avocado on hearty toast, fruity olive oil and just the right amount of spicy heat from the red pepper flakes.  Now as much as I love Swingers and the juke box that plays ‘Freebird’ and the purple cows on the wall, I eventually realized that I could just make the avocado toast at home.  It’s such a simple combination that it’s hard to believe that I didn’t come up with this on my own, but now that I’ve started making it at home, I can’t get enough of it.  Whenever my boyfriend calls to ask if I need anything from the store, my response now is usually “can you grab me an avocado?”  For those of you who want something a little more sweet in the mornings, I also love banana toast with brown sugar, a little honey, and cinnamon.  Either way, you can’t go wrong!
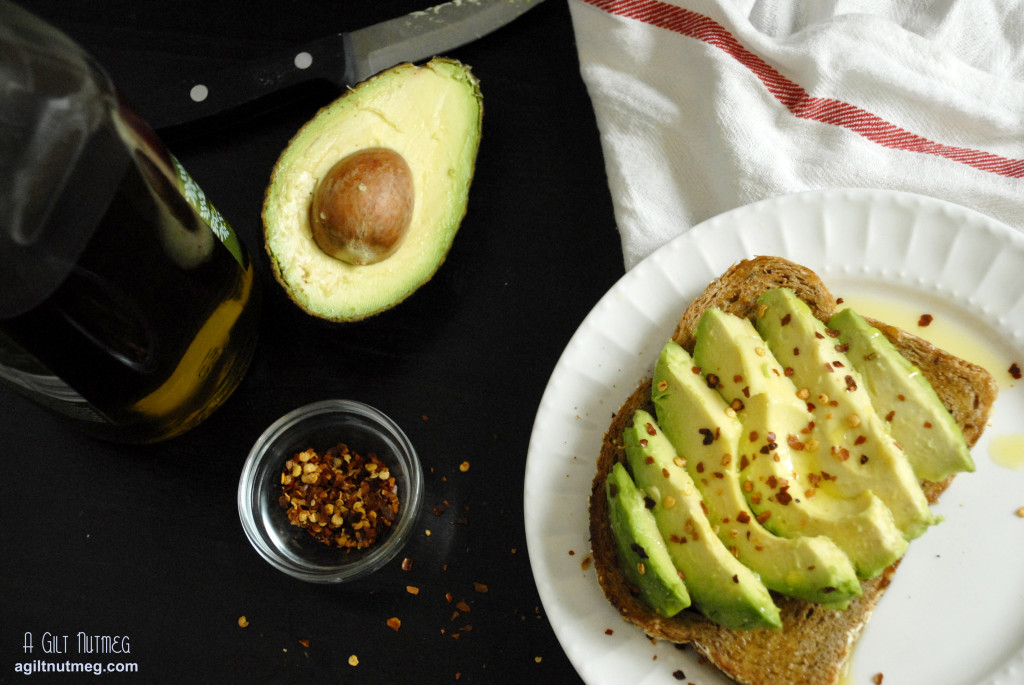
avocado toast watermark

Avocado Toast
Adapted from Swingers Diner

  • 1 slice hearty, whole grain bread (trust me, I love white bread, but this just tastes better on whole grain toast)
  • 1/2 of an avocado, peeled and sliced
  • about 2 Tablespoons good quality extra virgin olive oil
  • red pepper flakes
  1. Toast bread
  2. Arrange avocado slices on toast
  3. Drizzle with olive oil
  4. Sprinkle with red pepper flakes to your own desired amount and enjoy
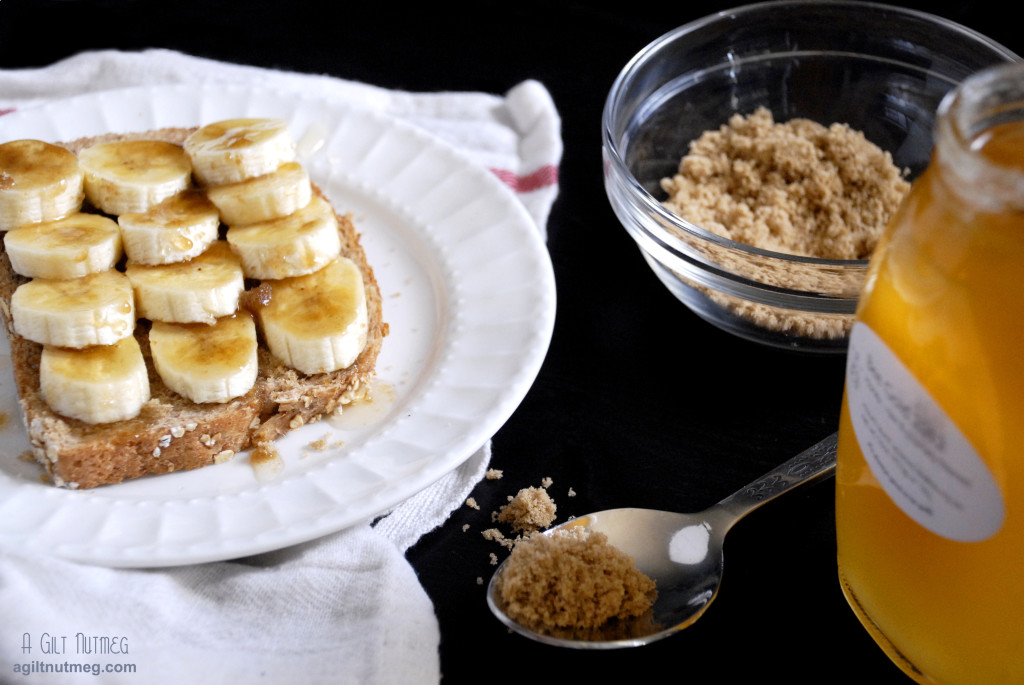
 

banana toast watermark

Banana Toast
Adapted from Seasaltwithfood*

  • 1 slice whole grain bread
  • 1 banana, peeled and sliced
  • 1 tablespoon brown sugar
  • 1 tablespoon honey
  • cinnamon
  1. Toast bread
  2. Arrange banana slices on toast
  3. Sprinkle with brown sugar and drizzle on honey to taste
  4. Lightly dust with a pinch of cinnamon and enjoy

*Seasaltwithfood’s version is baked and broiled for a great creme brulee like sugar crust on the bananas.  While simple enough, I wanted something even easier for a Sunday morning, which means no oven-but I can’t deny, I’m excited to try the broiled version, too someday!

Salsa Verde

Wednesday, August 1, 2012

salsa verde

If you want something a little different from your average (and often flavorless) salsa from a jar in the grocery store, this quick salsa verde is a great break from the norm and super easy to make.  When we go to the Mexican restaurant near my apartment, I like to double dip my chips in both the red salsa and the salsa verde (which is Spanish for “green”) for a flavor combo better than each salsa on its own!

Salsa Verde
Makes about 1 cup
Adapted from Serious Eats

  • 1 large poblano chile, seeded and roughly chopped (very dark green, about the size of a bell pepper)
  • 2 serrano chiles, roughly chopped; discard seeds if you want a mild salsa (small skinny light green peppers, about 2” long)
  • 1 large tomatillo, quartered
  • 6 sprigs cilantro
  • 2 medium cloves garlic, chopped
  • 3/4 cup water
  • 1/2 cup sour cream
  • 1-2 tablespoons freshly squeezed lime juice
  • Kosher salt to taste
  1. Boil the chopped poblano chile, serrano chiles, tomatillo, cilantro, garlic, and water in a small sauce pan for 10 minutes.
  2. Pour the contents of the saucepan into a blender or a food processor (although be warned the food processor may leak a little bit as you blend, but not too badly).
  3. Stir in the sour cream, lime juice, and salt to taste
  4. Enjoy with tortilla chips and good company!

Happy Birthday, Little Blog! + Fruity Pebbles Treats

Friday, May 25, 2012

blogiversary fruity pebbles treats

One year ago today, I took my first little step into blogging.  A Gilt Nutmeg is one year old.  I wasn’t sure exactly why I wanted to start blogging, but I knew somehow that it was the right path to start walking down.  One year later and I can’t even begin to describe what this little project has done for me.  On the most basic of levels, it has taught me cooking skills I never would have guessed I would possess.  It has forced me to continue trying new recipes as often as I could instead of relying on tired old recipes I’ve used a million times and, perhaps most importantly, given me a focus in life for this odd in-between stage of being in my mid-twenties.  I admit, coming home from a job in a field I never planned to go into can be very draining and I think if it weren’t for the blog, I would just go home and plop in front of the tv each night with some fast food-and this is coming from someone who loves to cook!  Cooking was such an important part of my childhood that I think it was really just waiting patiently inside of me, waiting until I had a kitchen of my own (or at least roommate who didn’t commandeer it) and the drive to really get in there and let all this pent up cooking shine and spark out of me like a Katy Perry music video.

blogiversary fruity pebbles treats wide shot

So now I cook as often as I can.  I have a CSA box delivered once a month with organic fruits, veggies and herbs.   My baking cabinet is now so full of supplies that I have to store my cupcake tins on a chair at the dining room table because there’s just no room anymore.  I can proudly say that I know what an f-stop on a camera is, Jonathan Gold ate and liked my pie, and that I have been recognized by the New York Times as something “they’re reading“.  If you had told me a year ago that I could check even one of those things off my bucket list, I would have thought you were crazy….but here we are.  I can’t thank you enough for the support and encouragement you, my dear friends, family and readers have given me over the last 12 months.  Truly, nothing makes my heart sing more than to hear that someone has tried a recipe from my blog and loved it as much as I did.

To celebrate, I did want to pull an oldie but a goodie out of the hat: Fruity Pebbles Treats.  Just like Rice Krispies Treats except you swap out the flavorless puffed rice with one of my all time favorite forbidden cereals, which just happens to be packed with flavors (albeit extremely artificial flavors).  You put one of these gorgeously colored treats in front of me and I guarantee that plate will be licked clean in no time at all!

Fruity Pebbles Treats
Makes 1-2 dozen, depending on dish size and cutting measurements

  • 1/4 cup unsalted butter
  • 1 bag (10 oz) mini marshmallows
  • 1 box (11 oz) Fruity Pebbles
  1. In a large stock pot, melt the butter over medium heat.  In the meantime, spray an 8×8 baking dish or a 9×13 baking dish with non-stick cooking spray.  An 8×8 pan will yield fewer treats, but they’ll be thicker (as in my photo).  A 9×13 dish will give you much thinner treats, but more of them.
  2. Add the mini marshmallows to the melted butter, stirring until they are melted entirely and incorporated with the butter.
  3. Add the Fruity Pebbles, turn off the heat, and gently stir and fold the cereal into the marshmallow-butter mixture.  Keep mixing until all the white patches of marshmallow are gone and the cereal is evenly coated in marshmallow.
  4. Dump the cereal-marshmallow mixture into the prepared dish and firmly press the mixture flat into the pan.  I use a lot of pressure, because if you squish the cereal down enough, it’ll break up a little and make for a chewier treat instead of an airy one that falls apart.
  5. Put in the fridge to cool.  Once cool, flip the treats out onto a cutting board and slice with a pizza cutter or large knife.  Enjoy!!

Herbed Cucumber Bites

Wednesday, May 23, 2012

herbed cucumber bites

At the bridal shower a few weeks back, I was sure the Margarita Cupcakes would be the hit of the party.  If not them, then maybe the Strawberry Bruschetta.  Never did I expect these little cucumber bites might actually be the winner of the afternoon!  They’re the only appetizer I completely ran out of ingredients on and everyone kept remarking on how delicious they were.  Best of all, they’re ridiculously easy to make and shockingly addictive-you’ll find yourself going back and popping another in your mouth every chance you get!

Herbed Cucumber Bites
Ever so barely adapted from Annie’s Eats
Makes approximately 3 dozen

  • 5-6 large cucumbers
  • 3 boxes of Garlic Herb Boursin cheese
  • 6 tablespoons heavy cream
  • Chives
  1. In a small bowl, mash and mix the Boursin and cream until creamy and fully combined.
  2. Using a vegetable peeler, peel long lengthwise strips from the sides of the cucumbers, about 4-6 strips, depending on how large your cucumbers are.  By doing this, when you slice the cucumbers, they’ll have those great stripes.
  3. Slice the cucumbers into 1/2″ - 1″ slices.
  4. Using a spoon, scoop out the seeds from the center, leaving a little bit of cucumber in the bottom of the cup to hold the cheese in.  You can slice and scoop the cucumber pieces the night before if you want, just store in an airtight container in the fridge, along with the cheese mixture.
  5. Fill a pastry bag, fitted with a star tip, with the Boursin mixture and pipe the cheese mixture into each cucumber slice.  You’ll want to move in a small circular motion to make sure every bit is filled.
  6. Snip chives into pieces about 1 1/2″ long and adorn each cucumber bite with one piece of chive.
  7. Arrange on a platter and enjoy!

Strawberry Basil Bruschetta with Lemon Goat Cheese

Friday, May 18, 2012

strawberry bruschetta

I have to admit that, when cooking, I’m not very adventurous when it comes to flavor combinations.  I think that’s why I was so proud of my alterations to this recipe: there are so many flavors that, despite being such a simple food to grab off a platter, the taste ends up being quite complex.  Balsamic vinegar and strawberries are actually quite an old combination, but one I still find awfully strange.  Basil and strawberries is an even less common combination and one that is shockingly perfect-you’ll have to taste it to believe it.  Add in some lemon goat cheese, a good baguette and a crack of fresh pepper over the top and you’re going to have such a crazy and delicious moment going on in your mouth that you’re just not going to know what to do with yourself!  You’d never think those flavors would go well together but you’ll find you and your guests reaching for these bruschetta over and over again.

Strawberry Basil Bruschetta with Lemon Goat Cheese
Adapted from Annie’s Eats
Makes 2-3 dozen pieces

  • 1 good quality baguette
  • 1 lb of strawberries, sliced
  • 3 tablespoons sugar
  • 1 package (4 oz) of lemon goat cheese (or 1 package plain goat cheese combined with zest from half a lemon)
  • balsamic vinegar
  • handful of whole fresh basil leaves
  • fresh ground black pepper
  1. Up to a few days before or at least a half hour before you need them, slice the strawberries, add them to a large bowl and mix the sugar in until thoroughly combined.  Set in the fridge until ready to use.
  2. The day you plan to eat the bruschetta, slice the baguette into slices, cutting at an angle.  Toast the baguette slices under your oven’s broiler until golden brown on each side.  Set aside and allow to cool.
  3. When cool, spread a thin layer of lemon goat cheese on each baguette slice, top with a spoonful of strawberries.
  4. Drizzle a small spoonful of balsamic vinegar over each slice with strawberries on it.
  5. To cut the basil, lay the leaves flat on top of each other, fold the pile in half and with a sharp knife or with kitchen scissors (I prefer the scissors), cut the basil in to thin strips.  Sprinkle the basil strips over the strawberries.
  6. Crack fresh pepper over the top of each bruschetta and enjoy!

Amanda’s Bridal Shower & Watermelon Gin Fizz

Monday, May 7, 2012

margarita cupcakes

On Saturday I had the honor of making the food for the bridal shower of my dear friend’s sister.  I learned a very important lesson this weekend: catering is EXHAUSTING.  I also learned that you should NOT leave something as finicky as Swiss Meringue Buttercream Frosting to the very last minute because you will be literally running on foot to the closest mini-mart for butter to start a backup American style Buttercream that will have you leaving 2 hours later for San Diego than planned.

herbed cucumber bites

Since the party was for 2pm on a gorgeous spring day, I had planned out a menu that would be very light and all non-fork foods for the guests to snack on.  Would you believe that out of all of the different items, the hit of the party were the cucumbers?  Also, a green and red theme inadvertently emerged and yet the table somehow didn’t look like Christmas, which is a miracle-instead all the green just reminded you that Spring was getting underway.  I’ll be posting the recipes throughout the week; any one of them would be a great appetizer to a Spring dinner.

While tiring, the experience was very rewarding and I’m so proud and happy to have been able to do this for my friend’s family.  I wish nothing but the best for Amanda and Christian!

Menu

  • Herbed Cucumber Bites
  • Strawberry Basil Bruschetta with Lemon Goat Cheese
  • Shaved Asparagus, Prosciutto & Parmesan Tea Sandwiches
  • Margarita Cupcakes (it was Cinco de Mayo, after all)
  • Watermelon Gin Fizz

strawberry basil bruschetta

Since I don’t have a great photo of the drink, I’ll post the recipe here and save the other recipes for their own posts.  It is going to be perfect for a hot summer’s day with friends and I can’t wait to drink it all season long.

Watermelon Gin Fizz
Adapted from Eating Well

  • 1 medium sized watermelon (the melons a little bigger than a soccer ball)
  • 2 bottles (2 liter size) of ginger ale
  • about 1/2 a  bottle of gin (you can, of course, adjust this to taste)
  • Juice of 3 limes
  • extra limes to cut for garnish, if you wish
  1. Cut the watermelon into large chunks.  If you wish (and I highly suggest it) set aside about 1/3 of the melon and neatly cut those slices into 1″ cubes.  Put the cubes in a bag and put them in the freezer to act as edible ice cubes later.
  2. Puree the remaining watermelon in a blender or food processor (although the processor isn’t liquid proof so it may make a bit of a mess) and strain the watermelon puree in a sieve; discard the fibers and seeds left behind in the sieve.  You should end up with about 12 cups of juice.  This step can be done a few days ahead of time; refrigerate until needed.
  3. When ready to serve, combine the watermelon juice, ginger ale, gin, and lime juice.  Stir, add the watermelon “ice cubes”, and enjoy!

Another great hostess tip: In addition to the watermelon ice cubes, fill a cupcake pan with one round slice of lime (or lemon) in each of the 12 cupcake wells, then fill each well about half way with boiling water (boiling the water means the ice will freeze clear instead of looking white).  Put the tray in the freezer and voila!  Some of the cutest decorative ice cubes ever for your punch.  If you have trouble getting them out of the cupcake pan, run some warm water over the pan to loosen them.

Vanilla Honey Caramel Corn

Monday, March 26, 2012

honey vanilla bean caramel corn

Popcorn is, without a doubt, one of my favorite treats in all the world.  When we get within 100 feet of a movie theater, The Boyfriend has to take me by the arm and drag me in the opposite direction just so we can carry on with whatever it was we were doing before I smelled the popcorn.  If movie theater popcorn is my first love, then caramel popcorn is my secret mistress (clearly I just finished watching MadMen).  I usually go for the salty, buttery crunchy deliciousness of normal popcorn, but when I get that off craving for something sweet, caramel corn is one of the first things I turn to.

This recipe is special, though, because it’s not your typical coated-in-corn-syrup-just-so-you-get-a-sugar-fix caramel popcorn, but instead something much more sophisticated.  The flavors here are complex-honey, vanilla, and just enough burnt sugar to remind you there’s still caramel here.  In a word: phenomenal.  Making popcorn at home is much simpler than most people realize, so I encourage you to give it a shot; turning it into this deliciously coated popcorn is just a few extra steps.  I promise, you’ll think it’s worth it when you’re munching away and are surprised to find it all gone in minutes.

Vanilla Honey Caramel Popcorn
Adapted from Eat the Love’s amazing Wordless Recipe

  • 1 Tablespoon oil
  • 1/3 cup popcorn kernels
  • 1 teaspoon salt
  • 1/2 cup honey
  • 1 teaspoon vanilla bean paste (extract will do, as well, but it’s fun to see the beans on the popcorn!)
  • 1/4 cup heavy cream
  • 2 Tablespoons butter
  1. Heat the oven to 300 degrees.
  2. In a large pot, add the oil and 3-4 popcorn kernels.  Once those kernels pop, you know the oil is hot enough; dump the 1/3 cup of kernels into the pot and put the lid on the pot.
  3. Immediately pull the pot off the heat, count to 30 seconds, shaking the kernels around in the pot every once in a while, then return the pot to the heat.  The popcorn will begin to pop very shortly-make sure the lid is tilted ever so slightly so that steam can escape but not so much that popcorn flies out!
  4. Once most of the kernels are done popping, turn off the heat and dump the popped popcorn into a large mixing bowl.  Sprinkle with the salt, and set aside.
  5. In a medium saucepan, add the honey, vanilla, cream, and butter.  Using a candy thermometer, heat the mixture to 245-250 degrees (the Firm Ball stage if you’re a candy maker).  While it’s heating, line a baking sheet with parchment paper.
  6. Once it’s reached the right temperature, pour the mixture over the popcorn and toss until the popcorn is evenly coated.
  7. Spread the popcorn over the parchment covered baking sheet in an even layer and put it in the oven for 15 minutes.
  8. Take the popcorn out and let the baking sheet cool on a wire cooling rack.  You won’t be able to resist taking a nibble as soon as its out of the oven, and I can warn you now that it will be soft and not appealing at all.  As it cools it will harden into the crunchy deliciousness you expect.
  9. Once it cools, break the popcorn up, if it cooled into clumps, and serve.  Enjoy!

Note: I made this recipe two days ahead of time for a weekend get-away treat and, just my luck, we had a rainstorm and the humidity went through the roof.  I watched sadly as my popcorn got progressively soggier and soggier.  Luckily, all it took was a pop back in the oven for 15 minutes at 300 degrees and it crisped right back up again!

Baked Crispy Asparagus with Blue Cheese Dipping Sauce

Friday, February 10, 2012

baked crispy asparagus fries

I’m a pretty picky eater.  And because of that, when I buy certain ingredients for recipes, I buy them in the smallest amount, knowing sadly that some of it will go to waste.  I try to encourage The Roommate and The Boyfriend to eat up, but to no avail.  So here I was with a partial container of sour cream, a partial carton of buttermilk, a partial package of chives, and a partial container of blue cheese crumbles in the fridge.  I also bought beautiful asparagus yesterday, spur of the moment, because whereas a pound is normally around $5, it was on sale for 99 cents!  (I had to explain to my East Coaster friends that it wasn’t discounted because it was gross, but that So Cal is having a lovely warm mild winter so asparagus is growing early like crazy and they’re trying to sell it as fast as they can.)

So here I am browsing Pinterest and I see a pin for crispy asparagus with dipping sauces.  Curious, I scan the recipe and I start thinking, “…buttermilk, I have that!…sour cream, I have that!…blue cheese, I have that!” and so all of that, paired with the fact that this beautiful asparagus needed to be eaten, I knew exactly what I was making when I got home.

and now I can say, this is a phenomenal recipe!  I have never had so much fun eating asparagus.  Roommate, Boyfriend, and I couldn’t stop eating them and I honestly can’t believe that ingredients I normally don’t like (mayo, sour cream, etc…notice a white gloppy pattern?) all come together to make such a delicious sauce.  Bonus: the asparagus is baked so it’s super healthy-and let’s just leave it at that and not think about whether the dipping sauce is healthy or not, shall we?


Baked Crispy Asparagus with Blue Cheese Dipping Sauce
Adapted from SpoonForkBacon
Makes 1 lb of asparagus and almost 1 cup of dipping sauce

Asparagus

  • 1 lb of thin asparagus spears, tough ends removed
  • 1 cup almonds
  • 2 cups panko bread crumbs
  • 2/3 cup flour
  • 4 eggs
  • cooking spray

Dipping Sauce

  • 1/4 cup light mayonnaise
  • 1/4 cup light sour cream
  • 1/4 cup crumbled blue cheese
  • 2 tablespoons milk
  • 1 1/2 tablespoons chives, chopped
  • 1 teaspoon fresh lemon juice
  • salt and pepper to taste
  1. Heat oven to 375 degrees and cover a baking sheet with parchment paper.
  2. In a food processor, process the almonds and panko bread crumbs until finely ground and combined (I used whole almonds because they were on sale, so I processed them up first for a few seconds before adding the panko crumbs.  If you buy pre-sliced almonds, just throw the panko and almonds all in at once).
  3. In three separate dishes, put the flour in one dish, put half the almond-panko mixture into another and 2 of the eggs, beat with a fork, into the third.  I started with just half the almond-panko mixture and half of the eggs in the pans because the panko gets a little clumpy when the egg drips in it and then the egg gets a little clumpy when the panko falls in it.  Basically, you need a half-time to rinse the pans out and start fresh.
  4. Roll the asparagus in the flour, dip it into the egg, then dip it into the almond-panko mixture and lay it in rows on the cookie sheet.
  5. Once all the asparagus is rolled, dipped and dipped again, lightly spray the asparagus on the cookie sheet with cooking spray and then put it in the oven to bake for about 15 minutes until golden brown.
  6. While the asparagus is baking, put all the ingredients for the dipping sauce into a small bowl and mix until thoroughly combined.
  7. Serve the asparagus hot and dipping sauce cold and enjoy!

Trailer Trash Queso

Friday, February 3, 2012

I will begin this blog post with a sincere apology to anyone I may be offending with the name that stuck to this recipe.  Namely, my Aunt Christy and Uncle John, who so lovingly shared this recipe with me years ago (actually, it was less ‘loving’ and more like “YOU’VE NEVER HAD QUESO!??!?!”) and who are certainly not trailer trash, as far as I know.

But really, this has Velveeta in it and that’s why it has become named as such- when my friends ask for my queso recipe, I have to ask in return “do you want the white queso or the trailer trash queso?”, because that was the only way I could figure to distinguish the two recipes clearly.  I have to admit: no one ever wants the white queso recipe.  This queso recipe is probably my most famous recipe of all time amongst my friends; if a friend mentions they’ve never had queso, the other friends give each other knowing looks and say “your life is about to be changed”.  I tried to get Ace to make white queso this year for the Super Bowl and her response was “…but this one has SAUSAGE“, as if I had just suggested she serve celery sticks and carrots instead.

Although I may be a traitor to the foodie blog world by sharing a recipe that has fake cheese in it and is made in the microwave, make this for your Super Bowl Party for a sure-fire hit, whether it’s a party of 20 or a party of 1 (but just know that if it’s for a party of 1, you’ll still finish the bowl because you won’t be able to stop).

Trailer Trash Queso

Makes a large bowl that will feed a good sized crowd, or a group of 4 gluttonous college girls watching Project Runway

Note: the queso will unappetizingly harden as it cools, so be ready to serve it immediately after you make it.  If you’re taking it to a friend’s house for a party, I fry the sausage at home and bring it in a tupperware so that I can easily assemble the rest of the recipe at the other location.

  • 1 tube of hot sausage
  • 2 lbs Velveeta (the large box), roughly cubed or if you’re lucky enough to find “Velveeta Mexican”, substitute that instead! (it comes only in the 1 lb boxes so you’ll need 2)
  • 1 package (8 oz) of cream cheese, roughly cubed
  • 1 can of Rotel or other brand of diced tomatoes and green chiles
  • tortilla chips
  1. Fry up the sausage, trying to chop it up into pieces as small as possible.  Once cooked through, transfer the sausage on to a thick stack of paper towels on a plate to drain (clearly the last thing you need is additional fat in this recipe).
  2. Add the Velveeta cubes, cream cheese cubes, Rotel, and sausage into a large microwave safe bowl (I try not to leave the cream cheese on top because it tends to pop).
  3. Microwave for 4 minutes, stir vigorously (yes, it will look DISGUSTING at this point), microwave for 4 more minutes and stir vigorously again.
  4. Serve with tortilla chips and be prepared to be grossed out at a) what you are putting into your body and b) how much of it you will willingly eat and crave again later.

Racer’s Macho Chili

Wednesday, February 1, 2012

With Super Bowl Sunday coming up, I thought you might want a really really good chili recipe for your party this Sunday…or for a cold winters night…or for basically any time you just want something delicious.  I know there are raging and almost violent debates out there about what makes an authentic chili-beans vs. no beans, ground beef vs. chopped beef, are tomatoes or tomato paste allowed, and so on and so forth; I also know that this chili breaks almost every one of those so-called “chili rules” and that I don’t care.  There is nothing more satisfying than a bowl of this chili-especially  because after simmering it for 3 hours, you’re STARVING unless you started way ahead of time (and when have you ever known me to do that?)

The recipe comes from Jack Westbrook from Texas.  I’m not sure where the name came from, but the recipe was given to my dad from a friend, Ed Jednacz, and as my family moved across the country from Oklahoma to Missouri to Pennsylvania to Georgia and now me in California and my sister in Washington DC, the chili recipe has maintained its revered status and traveled with us, which is certainly a testament to great chili.

My only rule with this chili: we don’t eat it with spoons.  Tortilla chips are all that you need to get this chili from bowl to mouth-and be sure to put lots of extra cheese on top.


Racer’s Macho Chili
Serves 6-10 approximately
Adapted to family tastes from Jack Westbrook’s original recipe

  • 2 1/2 lbs ground beef
  • 1 large yellow onion, diced
  • 1 jalapeno, diced
  • 3 cloves of garlic, minced or pressed
  • 1 can (15 oz or as close as you can get) of diced tomatoes
  • 1 can (6 oz) of tomato paste
  • 4 tablespoons of chili powder
  • 1 tablespoon sugar
  • 1 tablespoon black pepper
  • 1/2 tablespoon salt
  • 1/2 teaspoon oregano
  • 1/4 teaspoon of cumin
  • 1 cup water
  • 3 tablespoons flour
  • 2 cans pinto beans, drained
  • 1/2 lb Colby Jack longhorn cheese, grated, plus plenty of extra for sprinkling on top


  1. In a large pot, brown the beef and fry the onions until clear.
  2. If you’re using a crockpot, transfer the beef and onions to the pot and add the rest of the ingredients except for the water, flour, beans and cheese (I added helpful breaks in the ingredient list so you don’t accidentally just throw everything in).  If you don’t have a crockpot, just add the ingredients to the pot you were browning the beef in.
  3. Bring contents of pot to a simmer, then add the flour and water.  With the pot lid ON, simmer on very low heat for at least one hour. (If you don’t keep the pot lid on, all the liquid boils away and you’ll be very sad.  I know, I’ve done this.)
  4. Add the beans, then continue simmering on low heat (with the lid on) for another two hours at least.
  5. Add the grated cheese to the pot and stir into the chili 1-2 hours before serving.
  6. Serve with tortilla chips and extra grated cheese thrown on top.  Enjoy!!