Entries Tagged as 'Soup'

Homemade Chicken Stock

Monday, April 8, 2013

Homemade Chicken Stock - from agiltnutmeg.com

Nothing makes me feel more “Suzy Homemaker” than making homemade chicken stock.  You get more stock than you can use in a given time (freezer!), it tastes so much better than what comes out of a box and, incredibly, there’s almost nothing to clean up afterwards.  Throw the ingredients in a pot, turn on a movie for a few hours while it simmers, and voila: one step closer to being healthier and more homemade.

Homemade Chicken Stock
Loosely adapted from Martha Stewart

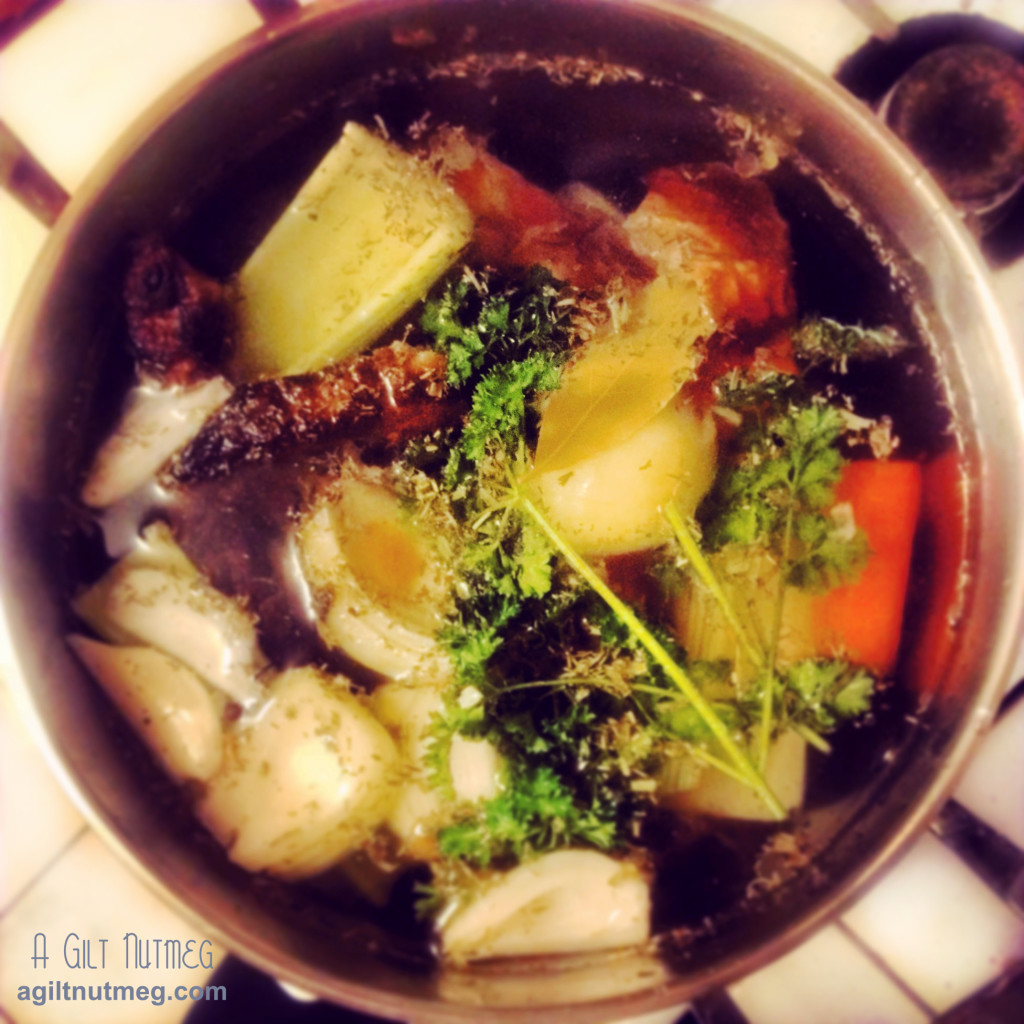
  • 1 roasted chicken carcass, most of the meat removed (*Note: this chicken was leftover from Easter; I brined it overnight in buttermilk and Williams-Sonoma Apples & Spice Turkey Brine)
  • 2 medium carrots, peeled and cut into 6 pieces
  • 1 large celery stalk, cut into 3 pieces
  • 1 medium white onion, peeled cut into 4 pieces
  • 3 large sprigs of parsley
  • 1 teaspoon salt
  • 1/2 teaspoon whole peppercorns
  • 2 dried bay leaves
  • 1 teaspoon (at least) of other dried herbs: I used about 1/2 tsp of dried dill, 1/2 tsp dried tarragon and 1/2 tsp dried herbs de Provence (I used the herbs de Provence because I was out of dried thyme, which you can use instead)
  1. Combine all ingredients in a 6 qt stock pot, cover with water about an inch from the edge of the pot and bring to a fast simmer, but not a boil.
  2. Reduce heat to low, so that the simmer is very slow and leave uncovered for 2 hours.
  3. If foam appears, skim it off the surface.
  4. Once two hours is up, remove largest pieces of chicken and strain stock through a fine mesh sieve.
  5. Store in refrigerator until needed, or freeze if you won’t be using it in the next few days.
  6. Enjoy some tasty soups or risottos!  Best of all, you don’t always have to follow a soup recipe; throwing things together into a pot at random often delivers just as tasty a meal.  With the first half of this soup stock, I heated 5 cups of stock in a large pot, threw in 2 packs of ramen noodles (discarded the flavor packets), a few handfuls of sliced scallions, a few handfuls of frozen edamame, a Tablespoon or so of soy sauce and, after turning the heat off before serving, added some pre-cooked shrimp with the tails removed so they would heat up in the broth but not overcook.  Voila!  Asian-inspired almost-sort-of-but-not-really ramen soup that was super tasty.  Just decide on the flavor profile you’re craving and go wild!

Wild Rice & Mushroom Soup

Thursday, February 7, 2013

Wild Rice & Mushroom Soup - A Gilt Nutmeg


This holiday, spent at home in Georgia, my little sister insisted that she wanted to make a recipe for mushroom soup she saw in the latest Cooks Illustrated.  I will be the first to admit that I wasn’t particularly excited about it, as mushrooms are not my favorite at all.  I’m really working hard on liking mushrooms, but the thought of  thick meaty slices of mushroom scared me: in soup there was nothing to hide them under!  Cut to Christmas dinner and I remember specifically saying “give me only a little, so I’ll have room for dinner” and then cut to me finishing that first bowl and scrambling to the pot to fill up my bowl beyond that tiny little first taste I had.  Somewhere during that taste, I had somehow forgotten that I don’t like mushrooms.

Folks, this is not your average mushroom soup; in fact, it’s not what you would expect from mushroom soup at all.  Instead of a heavy, thick, cream based soup that most of us are used to, this is a brothy soup that some how still tastes and feels creamy, despite having so little actual cream in it.  The mushrooms and wild rice are a wonderful texture contrast to each other (chewy vs soft) and also to the broth; the lemon zest and chives add an unexpected twist of bright flavor.  It’s salty and savory yet light and refreshing all at the same time.  Even if you’re a little hesitant to give mushrooms such a spotlight, you should give this soup a try for a delicious surprise -and if you do love mushrooms, all the better!

Note: I couldn’t find dried shiitake mushrooms, except for in large packages that cost $12 or more.  Instead I just bought 2 fresh shiitake mushrooms for a total of 60 cents and set them out on a saucer on my countertop to dry over the course of a week or so.  Low tech, but it worked, so I can’t complain.  To turn the mushrooms to dust, CI suggests a spice grinder or a blender.  I have neither of those, so I used a flat nutmeg grater to great effect.  My boyfriend used the top of my pepper grinder to grind up the little bits that were too little to grate without scraping my fingers.

Wild Rice & Mushroom Soup
Barely Adapted from Cooks Illustrated, Jan 2013
Serves 6-8

  • 1/4 ounce dried shiitake mushrooms, rinsed and grated to powder (see note above)
  • 4 1/4 cups water
  • 1 sprig fresh thyme
  • 1 bay leaf
  • 1 garlic clove, peeled, plus 4 cloves, minced
  • Salt and pepper
  • 1/4 teaspoons baking soda
  • 1 cup wild rice
  • 4 tablespoons unsalted butter
  • 1 pound white mushrooms, sliced 1/4″ thick (you can buy two bags of Trader Joe’s presliced mushrooms)
  • 1 onion, chopped fine
  • 1 teaspoon tomato paste
  • 2/3 cup dry sherry or dry vermouth
  • 4 cups low-sodium chicken broth
  • 1 tablespoon soy sauce
  • 1/4 cup cornstarch
  • 1/4 cup cold water
  • 1/2 cup heavy cream
  • 1/4 cup minced fresh chives
  • 1/2 teaspoon finely grated lemon zest
  1. Set oven to 375 degrees and while it’s heating, bring the water, thyme, bay leaf, garlic clove, 3/4 tsp salt, pepper, and wild rice to a boil in an ovenproof dutch oven.
  2. Add the wild rice, bring back to a boil, then cover and move the pot to the oven to bake for 40 minutes (or until rice is tender and chewy).
  3. Over a large mixing bowl, pour the dutch oven’s contents into a fine mesh sieve.  Pull out the bay leaf, thyme stem and garlic clove and discard.  Pour the rice liquid into a 4 cup measuring cup and add water until you have 3 cups of liquid total.
  4. Put the now-empty dutch oven on the stove and melt the butter over medium high heat.  Add the mushrooms, onion, 4 minced garlic cloves, 3/4 tsp salt, 1 tsp pepper and tomato paste and let brown, stirring every once in a while.  I thought it was taking too long and realized my heat was too low- as soon as I turned the heat up, I got the deep brown bits (called fond) on the bottom of the pan I was looking for.
  5. Add the sherry (or vermouth, which is what I substituted) and scrape up the brown fond on the bottom of the pan and continue cooking until almost all of the liquid gone from the pan.
  6. Add ground shiitake mushrooms, rice liquid, chicken broth, and soy sauce and bring the pot to a boil.  Lower the heat so the pot comes back down to a simmer and let it simmer for 20 minutes.
  7. In a small bowl, whisk together the corn starch and 1/4 cup of water until dissolved, then stir into the soup pot and let cook for 2 or 3 more minutes.
  8. Turn off the heat and stir in the rice, cream, chives, and lemon zest.  Serve hot and enjoy!


Chicken Soup with Rice

Friday, May 11, 2012

chicken soup with rice by maurice sendak

Last Tuesday, on May 8, the world lost a great presence.  Those of you who don’t know me personally won’t know that my other burning passion besides food is for children’s book illustrations (it doesn’t really come up on a food blog, after all).  I have Beatrix Potter prints in my apartment, my cell phone background is E. H. Shepard, and if I had an extra $3,500 would, without hesitation, buy my favorite Garth Williams illustration of a little sparrow eying a biscuit from “Stuart Little”.  And because of this love of illustration, Tuesday’s passing of Maurice Sendak was especially saddening.  Most people are familiar with Sendak’s “Where the Wild Things Are”, but I never really cared for that book as a child.  Instead I preferred-as anyone who loves cooking might- “Chicken Soup with Rice”.

Image Borrowed from Foodie Parent

The book is a tribute to eating chicken soup throughout the year, with a poem for each month.  I couldn’t think of a better way to celebrate Maurice Sendak’s life than to make a batch of Chicken Soup with Rice and read the book again.  The recipe is a great one that comes together very quickly, yet tastes like it’s been simmering for hours.  It will be perfect for every month of the year.  Maurice, you will be sorely missed.

In May
I think it truly best
to be a robin
lightly dressed
concocting soup
inside my nest.
Mix it once
mix it twice
mix that chicken soup
with rice.

Chicken Soup with Rice
Adapted from “Mad Hungry” by Lucinda Quinn via Martha Stewart
Makes 4 servings

  • 2 boneless, skinless chicken breasts
  • 2 Tbsp olive oil (divided into 1 Tbsp and 1 Tbsp)
  • 1 Tbsp butter
  • 6 spring onions (or scallions), white and light green parts only
  • 3 medium sized carrots
  • 2/3 cup chopped fresh parsley
  • 1/2 teaspoon dried thyme
  • 1 bay leaf
  • 48 oz box of low sodium chicken broth (6 cups)
  • 1 cup cooked rice
  1. Heat 1 Tbsp of olive oil in a stock pot; while it’s heating slice the chicken into approximately 1/2″ slices and then throw them into the pot to brown.
  2. While the chicken is browning, thinly slice the scallions and peel and slice the carrots into what my mom would always call “pennies”.
  3. When the chicken is cooked through and golden brown, move it to a bowl and set aside.
  4. Add the remaining Tbsp of olive oil and the butter to the pot and melt.  Add the onions, carrots, parsley, thyme and bay leaf.  Saute for about 3 minutes.
  5. Add the chicken broth and simmer for 5 minutes or so; in the meantime shred the chicken.  The easiest way to do this is to take two forks, stab one fork towards the end of a piece to hold it in place and drag the other fork across the chicken to pull it into long shreds and pieces of various sizes.
  6. Add the chicken and rice to the soup and simmer for another 5 minutes or so until the chicken and rice are heated up.
  7. Remove the bay leaf and enjoy while reading the appropriate month’s poem in “Chicken Soup with Rice”.

**Note: the soup is delicious, of course, as leftovers, but the rice does tend to get a little mushy the next day.  Best not to let it sit in the fridge for more than 24 hours before eating the rest of it.  Also, the broth is my favorite part of any soup, so when I reheated it, I added an extra little bit of water to the bowl-it gave me a little more broth without diluting the flavor.

Carrot Vichyssoise

Monday, April 2, 2012

Carrot Vichyssoise

Here I was, on a Friday afternoon, pondering where my next week of blogging might go, when it occurred to me to  check the calendar.  And boy howdy am I sure glad I did, because I had no idea that Easter and Passover were only a week away!  Of course, the blog week took shape very quickly thereafter and the first holiday cooking I’m tackling is Easter.  I wanted to do something “appropriate” (spring…bunnies…you get the idea), but I did Carrot Cake  a few weeks ago for Project Pastry Queen and I wasn’t yet ready to blog about the traditional ham or lamb, so I had to get creative.

Wanting something a little out of the standard Easter fare, I was delighted to stumble across this recipe for Carrot Vichyssoise.  Vichyssoise is a potato leek cream soup served cold and this variation brings carrots to the mix, which adds a lively flavor and color to the soup.  I thought it might be hard to enjoy eating cold soup, just because hot soup, no matter the weather, is one of my favorite things in the world, but this soup is filling yet light and refreshing at the same time and the cold didn’t bother me at all.  It will be a fantastic part of your Easter supper and, if you just can’t deal with the cold, it’s great hot, too.  The Easter Bunny will be pleased!

Carrot Vichyssoise
Adapted from Whole Living
Serves 6

  • 3 large leeks (about 1 1/2 lbs), white and light green part sliced into 1/4″ pieces
  • 2 cloves of garlic, minced or pressed
  • 4 Yukon Gold potatoes (about 1 1/2 lbs), peeled; 3 diced, 1 set aside
  • 5 large carrots (about 9 oz), peeled; 3 sliced, 2 set aside
  • 2 1/2 cups low-sodium chicken broth
  • 2 cups water
  • 1 1/2 teaspoons salt
  • 1/8 teaspoon fresh ground pepper
  • 2 cups whole milk
  • chives for garnish
  1. Add about a tablespoon or two of olive oil to a large pot and turn the heat on to medium-low.  Add the leeks and garlic and cover with the pot lid, cooking for about 15 minutes.
  2. Add the diced potatoes, sliced carrots, chicken broth, water, salt and pepper.  Bring the pot to a boil and then turn the heat down so it’s simmering for 20 minutes.
  3. Once the vegetables are tender, turn off the heat, stir in the milk, and either transfer the mixture to a blender, or use a stick blender right in the pot to blend until smooth.
  4. Let the soup cool (I transferred it to a large glass bowl to speed the cooling along), then move it to the refrigerator to chill.
  5. While the soup is chilling, set a small pot of water to boil and make a small bowl of ice water.  Grab that last potato and the 2 extra carrots and slice them into small matchstick shaped pieces about 2 inches long
  6. Boil the matchstick potatoes and carrots for 3-4 minutes, until just tender (you don’t want them too soft) and then drain the pot.  Add the carrots and potatoes into the ice water to stop them from cooking any further.
  7. When ready to serve, ladle the soup into bowls and garnish with the potato and carrot matchsticks and the chives.  Be sure to share some with the Easter Bunny and enjoy!

Racer’s Macho Chili

Wednesday, February 1, 2012

With Super Bowl Sunday coming up, I thought you might want a really really good chili recipe for your party this Sunday…or for a cold winters night…or for basically any time you just want something delicious.  I know there are raging and almost violent debates out there about what makes an authentic chili-beans vs. no beans, ground beef vs. chopped beef, are tomatoes or tomato paste allowed, and so on and so forth; I also know that this chili breaks almost every one of those so-called “chili rules” and that I don’t care.  There is nothing more satisfying than a bowl of this chili-especially  because after simmering it for 3 hours, you’re STARVING unless you started way ahead of time (and when have you ever known me to do that?)

The recipe comes from Jack Westbrook from Texas.  I’m not sure where the name came from, but the recipe was given to my dad from a friend, Ed Jednacz, and as my family moved across the country from Oklahoma to Missouri to Pennsylvania to Georgia and now me in California and my sister in Washington DC, the chili recipe has maintained its revered status and traveled with us, which is certainly a testament to great chili.

My only rule with this chili: we don’t eat it with spoons.  Tortilla chips are all that you need to get this chili from bowl to mouth-and be sure to put lots of extra cheese on top.


Racer’s Macho Chili
Serves 6-10 approximately
Adapted to family tastes from Jack Westbrook’s original recipe

  • 2 1/2 lbs ground beef
  • 1 large yellow onion, diced
  • 1 jalapeno, diced
  • 3 cloves of garlic, minced or pressed
  • 1 can (15 oz or as close as you can get) of diced tomatoes
  • 1 can (6 oz) of tomato paste
  • 4 tablespoons of chili powder
  • 1 tablespoon sugar
  • 1 tablespoon black pepper
  • 1/2 tablespoon salt
  • 1/2 teaspoon oregano
  • 1/4 teaspoon of cumin
  • 1 cup water
  • 3 tablespoons flour
  • 2 cans pinto beans, drained
  • 1/2 lb Colby Jack longhorn cheese, grated, plus plenty of extra for sprinkling on top


  1. In a large pot, brown the beef and fry the onions until clear.
  2. If you’re using a crockpot, transfer the beef and onions to the pot and add the rest of the ingredients except for the water, flour, beans and cheese (I added helpful breaks in the ingredient list so you don’t accidentally just throw everything in).  If you don’t have a crockpot, just add the ingredients to the pot you were browning the beef in.
  3. Bring contents of pot to a simmer, then add the flour and water.  With the pot lid ON, simmer on very low heat for at least one hour. (If you don’t keep the pot lid on, all the liquid boils away and you’ll be very sad.  I know, I’ve done this.)
  4. Add the beans, then continue simmering on low heat (with the lid on) for another two hours at least.
  5. Add the grated cheese to the pot and stir into the chili 1-2 hours before serving.
  6. Serve with tortilla chips and extra grated cheese thrown on top.  Enjoy!!

Cream of Tomato Soup

Wednesday, December 28, 2011


Well, the holidays are over and the leftovers are dwindling.  It’s cold outside and you don’t want something too heavy after finally eating the last of all the pie and cookies that were in your house.  Naturally, what do I turn to, but soup!  Now I admittedly love (LOVE) Campbell’s Tomato Soup with a grilled cheese sandwich, but I had the inspiration recently to make it from scratch and I have to wonder if I’m actually going to go back to Campbell’s now.

Making Cream of Tomato Soup from scratch means a whole new depth of flavors, instead of just the flat flavor you get from soup from a can, and the effort really isn’t that much more involved.  Plus, you lose all the salt and preservatives that you always find in prepackaged foods.

Cream of Tomato Soup

Adapted from Cooks Illustrated

Makes about 5 1/2 cups

  • 2 cans (28 oz) whole tomatoes (not packed in puree), drained, 3 cups juice reserved, tomatoes seeded
  • 1 1/2 tablespoons dark brown sugar
  • 4 tablespoons unsalted butter
  • 4 large shallots, minced
  • 1 tablespoon tomato paste
  • Pinch ground allspice
  • 2 tablespoons unbleached all-purpose flour
  • 1 3/4 cups chicken stock or canned low-sodium chicken broth
  • handful of fresh basil leaves
  • 1/2 cup heavy cream
  • 2 tablespoons brandy or dry sherry
  • Table salt
  • Cayenne pepper
  1. Heat oven to 450 degrees and line a rimmed baking sheet with foil.
  2. Spread the tomatoes out on the sheet and sprinkle the brown sugar over the tomatoes.  Bake for about 30 minutes until the tomatoes begin to brown a little, in the meantime…
  3. Melt butter in a nonreactive large saucepan.  Add shallots, tomato paste, and allspice.  Reduce the heat to low and let the shallots cook until soft (about 10 minutes).  Sprinkle flour over the shallots and stir until thoroughly combined, cooking for about 30 seconds.
  4. Whisking constantly, gradually add chicken stock; stir in reserved tomato juice, roasted tomatoes and basil leaves.
  5. Cover the pot with a lid and bring the contents to a boil.  Reduce the heat to low and simmer, stirring occasionally, for about 10 minutes.
  6. Using a stick blender, puree the contents until smooth.
  7. Add cream and heat over low heat until hot, about 3 minutes. Off heat, stir in brandy or sherry; season to taste with salt and cayenne.

(Cooks’ Illustrated adds that “this soup can be prepared through step 3, cooled, covered, and refrigerated for up to 3 days or frozen for up to 2 months. Reheat over low heat before proceeding with step 3″.)

Coral Tree Cafe Vegetable Soup

Wednesday, November 30, 2011

A few weeks ago I got an email from my second cousin saying that my great aunt had found my name in the LA Times newspaper.  Now while I let you wrap your head around those extended family connections, I’ll add that I had absolutely no idea what she was talking about or why my name would be in the paper.  I followed the link she sent to find that a recipe request I had submitted months before hand (and subsequently put on the back burner in my mind) had been answered!  This column in the LA Times food section, called “Culinary SOS”, will track down recipes for you from any restaurant in the country that is willing to share them…but vegetable soup?

Once you try it, this is the only vegetable soup you will ever want to eat (at least that’s how it worked for me).  The Coral Tree Cafe here in the Brentwood area of LA has lots of fancy sandwiches for a pretty penny and some equally expensive lovely baked goods, but whenever I’m there, I only have eyes for this huge $5 bowl of vegetable soup-which, I might add, was always a soup that was way at the bottom of my soup list.  It has some veggies thrown in there that aren’t typical of vegetable soup like zucchini and red bell pepper and I just love the soft yet chewy texture the pearl barley adds.  I’d even gone so far as to write down the veggies I could decipher on the back of a receipt, but was too worried that my attempted copy-cat soup would turn out vastly inferior.  Thus, writing to Culinary SOS.  It’s just vegetable soup, how hard can it be?  But as I said in my note to CSOS, there was some special ingredient that I knew I was missing.  It was marinara sauce.  Seriously.

Coral Tree Cafe Vegetable Soup
Adapted from the Coral Tree Cafe, courtesy of The LA Times’ Culinary SOS
Serves 8-10

  • 2 tablespoons oil
  • 2 cups diced carrots
  • 2 cups diced onions
  • 1/2 cup diced red bell pepper
  • 1 1/2 teaspoons chopped fresh thyme
  • 3/4 cup pearl barley
  • 1 quart (4 cups) vegetable broth
  • 1 1/2 cups marinara sauce
  • 2 cups quartered mushrooms
  • 2 cups diced zucchini
  • Salt and pepper
  1. In a heavy-bottomed stock pot or dutch oven, heat the oil over medium heat until tossing in a piece of onion means you hear a lot of sizzling.
  2. Add the carrots, onions, bell pepper, thyme and barley to the pot, stirring frequently so the barley doesn’t burn, for about 20 minutes.  The onions should be clear at this point.
  3. Add the vegetable broth and marinara sauce, cover the pot and bring to a boil, then reduce to a simmer for 10 minutes.
  4. Add the mushrooms and zucchini and let simmer for at least another 10 minutes.
  5. The instructions from Coral Tree say you can eat it now and if you like your veggies slightly crunchy still, go for it.  I prefer mine softer and simmering it for a while longer also means your barley puffs up a lot more.  I would let it go for at least another 30 minutes, with the pot covered.
  6. Serve hot with bread and butter on the side-it’s necessary for mopping up the last drips of broth.  Enjoy!

Potato Leek Soup

Wednesday, November 16, 2011

Last week my CSA box was delivered with some beautiful leeks in it.  If you know me at all, you’ll know that it’s been an uphill battle for me and onions and all onion related produce, but I dare you to try to deny the leeks that showed up on my doorstep.  Since I’d truthfully never actually cooked with leeks before, I wanted something simple and fool proof that I could use the leeks in; something that would be warm and satisfying after a long day at work yet simple enough that it didn’t feel like a chore to come home and make.

In Julie & Julia, the book starts out with Julie going to the market and absentmindedly buying food for dinner, realizing only on the way home that she’s purchased the exact ingredients for potato leek soup.  I’ve always found this story a little suspect since I can’t go to the market without forgetting something even when I have a list in front of my face, much less absentmindedly shopping, but the simplicity of this recipe has always appealed to me and when I pulled open the CSA box and found the leeks, I knew immediately that they were going into soup.

Julia’s recipe seemed to need a little jazzing up (it was just leeks, potato, and water), so I started from scratch and made my own recipe while trying to maintain the simplicity and up the flavor profile at the same time-The Boyfriend, who had already eaten dinner, tried a spoonful from my bowl of soup and proceeded to ask if he could have a whole bowl himself because it was “mad good”.  Music to a cook/girlfriend’s ears…

Potato Leek Soup
Serves 6

  • 4 medium-large russet potatoes, diced
  • 2 large leeks, trimmed down to light green portion, dark green leaves and root tips discarded, halved lengthwise then sliced
  • 5 cups chicken broth
  • 1 teaspoon salt
  • 1/2 teaspoon white pepper
  • 1/2 cup sour cream
  1. In a large pot, add the potatoes, leeks, and chicken broth.  Bring contents to a boil, then lower to a simmer for 30-40 minutes until vegetables are soft.
  2. Turn off heat and puree potatoes and leeks with a stick blender (or in a traditional upright blender).
  3. Stir in salt and white pepper, then stir in 1/4 cup of sour cream at a time, making sure the sour cream melts completely into the soup and there are no white streaks after each 1/4 cup.
  4. Serve warm and enjoy!

Curried Butternut Squash Soup

Sunday, October 9, 2011

I can’t lie, I considered skipping this week’s Project Pastry Queen assignment.  I have a go-to recipe for Butternut Squash soup that I created myself and I just can’t bear to leave it behind.  That said, I’m glad I gave this one a try because it certainly gave my normal recipe a run for its money!

I had just come back from a weekend trip away so I wasn’t particularly looking forward to standing over a hot stove, but  it’s soup so it’s a cinch to throw together and let simmer while you take a disco nap in the hopes that you can sort of maybe catch up on the rest you didn’t catch up on over the weekend because you were having too much fun.  I don’t know why I always think soup is a long complicated process so I shouldn’t hesitate in the future.

This soup is a great recipe to keep for a cool Fall evening-the spices will warm you right up!

Note: 1 1/2 lbs of butternut squash is a relatively small squash compared to what I normally see at the grocery store.  Either make sure to get one that’s close (I had to do a 2 pounder), make a double batch of soup, or save the extra squash for something else, like Butternut Squash Risotto (my first recipe on the blog ever!)

Curried Butternut Squash Soup
adapted from The Pastry Queen, by Rebecca Rather
serves 4 to 6

  • 2 Tbs unsalted butter or olive oil
  • 1/2 medium yellow onion, chopped
  • 1 large carrot, peeled and sliced
  • 1 1/2 lbs butternut squash, peeled, seeded, and cubed
  • 1 medium russet potato, peeled and cubed
  • 1 tsp ground ginger
  • 1 tsp ground cinnamon
  • 1 1/2 Tbs curry powder
  • 1/2 tsp salt
  • 2 cups chicken stock
  • 1/2 cup milk
  • 1/2 cup heavy cream
  • 1 tsp honey
  • 1/2 tsp paprika
  • Freshly ground black pepper
  • Greek yogurt, for garnish
  1. Melt the butter in a large saucepan or Dutch oven over medium-high heat.  Add the onion and carrot and saute over medium heat for about 3 minutes, or until the onions begin to soften.
  2. Add the squash potato, ginger, cinnamon, curry powder, and salt;  Saute for 2 minutes.
  3. Add the stock, milk, cream, honey, and paprika and bring the soup to a boil.
  4. Decrease the heat, cover the pot, and simmer the soup over low heat for about 45 minutes, or until the vegetables are soft.
  5. Puree the soup with a stick blender (what? you don’t have one yet?!) until smooth.
  6. Add black pepper and additional salt to taste.  If the soup seems too thick, add more milk or chicken stock.
  7. Serve hot with a dollop of Greek yogurt on top-it adds a wonderful tangy flavor!

Acorn Squash Bisque

Wednesday, September 28, 2011

I have just been beside myself with glee watching all of the squash and pumpkin recipes popping up all over Pinterest and the food blogging community!  I love love love the Fall for cooking and I wasn’t sure where to start diving in but, I have to say, this bisque is an excellent start to the deluge of Fall recipes coming at you!

I admit that I was hesitant to switch it up from my normal Butternut Squash soup but was delighted with the results.  The recipe makes a delicious, almost delicate, bisque that would make a fantastic start to a large hearty meal, or just as a light meal in itself.  It does thicken up as leftovers, but reheat it very very gently, as mine started to curdle very quickly.  (You wouldn’t think it, but a quick whirl with the stick blender gets rid of all those unsightly white specks in an instant)

The soup was excellent with just the little bit of thyme seasoning it, yet I could tell I wanted just a teensy bit more flavor.  I make a mean Butternut Squash soup so I had to physically restrain myself from adding all the normal spices I add to that-I wasn’t making a clone, after all.  I left the nutmeg, the cinnamon, bay leaf, and rosemary behind (but it was almost painful to do so) and stared at the rest of my spice shelf.  I hesitated for a second before grabbing the cloves, knowing they would be overpowering if I wasn’t careful.  It was just what I was looking for!  1/8 of a teaspoon is honestly all that is needed for the whole big pot to give the soup that warm spiced flavor without losing the delicate acorn squash flavor.  It doesn’t have the stunning orange color that butternut squash soup or pumpkin soup does, but it is absolutely a wonderful addition to the Fall dinner table.


Acorn Squash Bisque
Adapted from Martha Stewart
Serves 4 as a main dish or more as a starter appetizer

  • 2 acorn squashes (3 pounds total)
  • 1 tablespoon butter
  • 1/2 - 1 medium onion, finely chopped
  • Coarse salt and ground pepper
  • 1/2 teaspoon fresh thyme leaves, plus more for garnish
  • 1 can (14 1/2 ounces) reduced-sodium chicken broth
  • 2 cups water
  • 1/2 cup half-and-half
  • 1/8 teaspoon ground cloves
  1. Preheat oven to 450 degrees.
  2. Halve squash lengthwise; scoop out and discard seeds. Place squash, cut side down, on a rimmed baking sheet; cover tightly with aluminum foil. Roast until almost tender when pierced with a knife, about 20 minutes minutes. When cool enough to handle, scrape out flesh and discard skin.
  3. In a large saucepan, melt butter. Add onion; season with salt and pepper. Cook, stirring occasionally, until tender, 3 to 5 minutes.
  4. Add squash, thyme, broth and water. Bring to a boil over high heat; reduce to medium, and cook until squash is very tender, 10 to 12 minutes.
  5. Working in batches, puree mixture in a blender until very smooth (or leave it in the pan and use a stick blender, the most useful soup tool ever). Return to pan; add half-and-half, cloves and season to taste with salt and pepper (mine didn’t need any extra).
  6. Serve garnished with thyme sprigs.